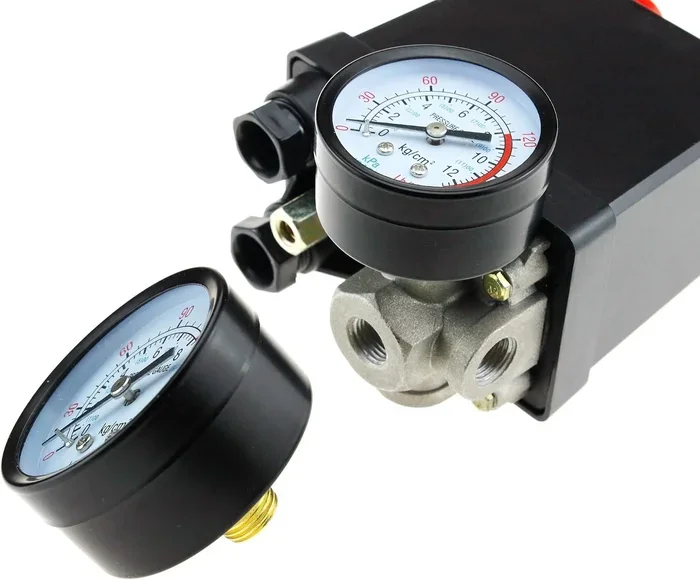
Ingersoll Rand Air Compressor Pressure Switch Guide
The Ingersoll Rand air compressor pressure switch is a critical component that controls when your compressor motor starts and stops based on tank pressure levels. Understanding how this switch works helps you troubleshoot problems, adjust settings correctly, and extend the life of your compressor. This guide walks you through every aspect of the pressure switch, from basic operation to full replacement.
This is a comprehensive guide about ingersoll rand air compressor pressure switch.
Key Takeaways
- The pressure switch acts as the brain of your compressor: it monitors tank pressure and tells the motor when to start and stop.
- Common symptoms of a failing switch include erratic pressure readings, compressor not starting, and continuous running: catching these early saves costly repairs.
- Adjusting cut-in and cut-out pressure is simple with basic tools: you can fine-tune your system for better efficiency.
- Replacing a pressure switch is a manageable DIY job: most homeowners can do it in under an hour with the right guidance.
- Regular maintenance prevents unexpected failures: cleaning contacts and checking wiring keeps your switch working reliably.
- Safety always comes first: disconnect power and release tank pressure before any work on the switch.
[FEATURED_IMAGE_PLACEHOLDER]
What Is an Ingersoll Rand Air Compressor Pressure Switch?
The Ingersoll Rand air compressor pressure switch is an electrical device that controls the on-and-off cycles of your compressor motor. Think of it as the gatekeeper for your entire system. It watches the air pressure inside the tank and sends signals to the motor based on what it reads.
When the pressure drops to a certain level, the switch tells the motor to kick on. When the pressure reaches the top limit, it tells the motor to shut off. This cycle keeps your compressor running efficiently and prevents the tank from overpressurizing.
Ingersoll Rand builds these switches to be tough and reliable. They are designed to handle the demands of both home workshops and heavy-duty industrial environments. The switch connects directly to the compressor pump and motor housing, usually mounted near the pressure tank.
Inside the switch, you will find a few key parts. There is a diaphragm that moves with pressure changes. There are contact points that open and close the electrical circuit. And there is an adjustment spring that lets you set your desired pressure range.
Most Ingersoll Rand compressors use either a 1.5 horsepower or 3 horsepower motor paired with a pressure switch rated for the specific load. The switch must match your compressor model exactly to work safely and correctly.
Why the Pressure Switch Matters
Without a working pressure switch, your compressor would run nonstop or never start at all. Either scenario causes serious problems. A compressor that runs constantly wastes electricity and overheats the motor. A compressor that never starts leaves you with no compressed air when you need it.
The pressure switch also protects your compressor from damage. It prevents the tank from exceeding safe pressure limits. This simple component saves you from expensive repairs and potential safety hazards.
How Does the Pressure Switch Work?
Understanding how the pressure switch works helps you troubleshoot problems faster. The process is straightforward once you see the big picture.
Here is how the cycle works step by step:
- The compressor fills the tank with air, raising the pressure inside.
- The diaphragm inside the switch feels the increasing pressure.
- When the pressure hits the upper limit (called the cut-out pressure), the diaphragm pushes against the spring.
- This movement opens the electrical contacts and shuts off the motor.
- As you use compressed air, the tank pressure drops.
- When the pressure falls to the lower limit (called the cut-in pressure), the spring pushes the diaphragm back.
- The contacts close again, and the motor starts running.
This cycle repeats automatically every time you use your compressor. The difference between the cut-in and cut-out pressure is called the pressure differential. Most Ingersoll Rand switches have a differential of about 20 to 40 PSI.
Understanding Pressure Differential
The pressure differential is the gap between when the compressor turns on and when it turns off. For example, if your cut-in is 100 PSI and your cut-out is 130 PSI, the differential is 30 PSI.
A wider differential means the compressor runs less often but uses more air each time it cycles. A narrower differential means more frequent starts and stops. Both settings have pros and cons depending on your application.
For most workshop users, a differential of 20 to 30 PSI works well. For industrial applications, you may want a wider differential to reduce motor wear from frequent cycling.
Common Pressure Switch Problems and Symptoms
Pressure switches can develop problems over time. Recognizing the early signs helps you fix issues before they cause bigger damage to your compressor.
Compressor Won’t Start
If your compressor does not start when the tank pressure drops, the switch might be the culprit. First, check if the switch is receiving power. Use a multimeter to test for voltage at the switch terminals. If power is present but the motor does not run, the switch contacts may be worn out or burned.
Another common cause is a stuck diaphragm. If the diaphragm gets stuck in the closed position, it will not trigger the motor to start even when pressure drops.
Compressor Runs Continuously
A compressor that never shuts off is a serious problem. This usually means the switch contacts are welded shut or the diaphragm is damaged. Running continuously will quickly overheat the motor and burn it out.
Turn off the compressor immediately if this happens. Check the switch contacts for visible damage. Look for pitting, discoloration, or melted plastic. These are clear signs the switch needs replacement.
Erratic Pressure Behavior
If your compressor cycles on and off too frequently, the pressure switch settings might be off. The cut-in and cut-out pressures may have shifted over time. This is common when the adjustment spring loosens or the diaphragm weakens.
Erratic cycling also puts extra stress on the motor. Each start-up draws more current than normal operation. Over time, this short-cycling wears out the motor bearings and reduces the compressor lifespan.
Pressure Switch Leak
Some switches develop air leaks around the fitting where they connect to the tank. This happens when the seal or gasket deteriorates. Air leaks waste compressed air and cause the compressor to run more often than needed.
Check the connection point for hissing sounds or visible air seepage. Tightening the fitting sometimes helps, but a worn gasket usually requires switch replacement.
How to Adjust Your Pressure Switch Settings
Adjusting the pressure switch allows you to set the exact pressures that match your tools and workflow. Most Ingersoll Rand switches have two adjustment screws on top of the unit.
The upper screw controls the cut-out pressure. This is the pressure at which the compressor shuts off. The lower screw controls the cut-in pressure. This is the pressure at which the compressor starts again.
Step-by-Step Adjustment Process
- Turn off the compressor and unplug it from the power source.
- Let the tank drain until the pressure reaches zero.
- Locate the two adjustment screws on top of the switch.
- Use a flathead screwdriver to turn the upper screw clockwise. This increases the cut-out pressure.
- Turn the lower screw clockwise to increase the cut-in pressure.
- Plug in the compressor and let it fill the tank.
- Watch the pressure gauge and note when the compressor starts and stops.
- Make small adjustments until you reach your desired pressure range.
Always refer to your specific Ingersoll Rand model’s manual for recommended pressure settings. Running the compressor above its rated pressure is dangerous and can damage the tank and motor.
Quick Tips for Adjustment
- Make small turns: adjust one quarter turn at a time and test the results.
- Keep a log: write down your settings so you can return to them if needed.
- Never exceed the rated maximum: check the nameplate on your compressor for the safe pressure limit.
- Check the pressure gauge: make sure your gauge is accurate before trusting the switch settings.
How to Replace the Pressure Switch
Replacing a pressure switch is one of the most common repairs you can do on an Ingersoll Rand compressor. With basic tools and a little patience, most people complete this job in under an hour.
What You Will Need
- Replacement pressure switch (match your compressor model)
- Screwdriver set (flathead and Phillips)
- Adjustable wrench
- Wire nuts or electrical tape
- Multimeter for testing
- Safety glasses and gloves
Step-by-Step Replacement
- Disconnect the power: unplug the compressor from the wall outlet. Do not skip this step.
- Release tank pressure: open the drain valve and let all the air out of the tank.
- Take photos of the wiring: before disconnecting anything, photograph the current wiring setup. This makes reassembly much easier.
- Disconnect the wiring: carefully remove the wires from the switch terminals. Label each wire if needed.
- Remove the old switch: use an adjustable wrench to loosen the fitting that connects the switch to the tank.
- Install the new switch: thread the new switch onto the tank fitting by hand first, then tighten with the wrench.
- Reconnect the wiring: match the wires to the correct terminals based on your photos.
- Test the switch: plug in the compressor and let it run. Watch for proper start and stop behavior.
For more information on handling electrical connections during equipment installation, check out our guide on how to install a generator transfer switch, which covers safe electrical wiring practices that apply to compressor work as well.
Common Mistakes During Replacement
- Forgetting to release tank pressure: this can cause injury when you loosen the fitting.
- Using the wrong replacement switch: always match the voltage rating and pressure range to your original switch.
- Over-tightening the fitting: this can crack the tank fitting or damage the switch housing.
- Mixing up the wires: this can cause short circuits or prevent the compressor from starting.
Maintaining Your Pressure Switch for Longevity
Regular maintenance keeps your pressure switch working reliably for years. A little preventive care goes a long way toward avoiding unexpected breakdowns.
Monthly Checks
- Inspect the switch for visible damage, corrosion, or dust buildup.
- Listen for unusual sounds during the on-off cycle.
- Check the pressure gauge for accuracy.
- Look for air leaks around the switch fitting.
Quarterly Maintenance
- Clean the switch contacts with a small wire brush or contact cleaner spray.
- Tighten any loose wiring connections.
- Check the diaphragm for cracks or wear.
- Verify the pressure differential is still set correctly.
When to Call a Professional
Some problems are beyond a simple fix. If you notice burned wiring inside the switch housing, a cracked tank fitting, or repeated switch failures, it is time to call a qualified technician. These issues can indicate deeper problems with the compressor system.
Also, if your compressor is still under warranty, contact Ingersoll Rand support before performing any repairs yourself. Opening the switch or tank may void the warranty coverage.
Expert Insight
Many compressor owners ignore the pressure switch until it fails completely. A proactive approach saves time and money. Treat the pressure switch like any other moving part in your compressor. Check it regularly, keep it clean, and replace it at the first sign of trouble. This simple habit keeps your Ingersoll Rand compressor running smoothly for decades.
Key Takeaways
- The pressure switch controls your compressor’s start and stop cycles: it is essential for safe and efficient operation.
- Common failure symptoms include no-start, continuous running, and erratic cycling: catch these early.
- Adjusting the switch is simple with two screws and a screwdriver: always make small adjustments and test results.
- Replacement is a straightforward DIY project: disconnect power, release pressure, swap the switch, and reconnect.
- Regular maintenance prevents unexpected failures: clean contacts, check wiring, and inspect the diaphragm often.
- Safety is non-negotiable: always disconnect power and release tank pressure before any work.
Conclusion
The Ingersoll Rand air compressor pressure switch is a small but mighty component that keeps your entire system running safely and efficiently. It controls when the motor starts and stops, protects the tank from overpressure, and ensures you have consistent compressed air when you need it.
By understanding how the switch works, recognizing early warning signs of failure, and performing regular maintenance, you can avoid costly repairs and extend the life of your compressor. Whether you are adjusting the pressure settings or replacing a worn-out switch, the process is straightforward and manageable for most homeowners.
Take the time to learn your specific Ingersoll Rand model. Read the manual, note the recommended pressure settings, and keep spare parts on hand. A little preparation goes a long way toward keeping your compressor running at peak performance for years to come.
Frequently Asked Questions
Can I replace the pressure switch myself?
Yes, replacing the pressure switch is one of the easiest DIY repairs on an Ingersoll Rand compressor. You only need basic tools like screwdrivers and an adjustable wrench. Just make sure to disconnect the power and release all tank pressure before starting. If you feel unsure about the electrical connections, consult a qualified technician.
What should my pressure switch settings be?
The correct settings depend on your specific Ingersoll Rand model and your intended application. Most home workshop compressors work well with a cut-in around 90 to 100 PSI and a cut-out around 120 to 130 PSI. Always check your owner’s manual for the manufacturer’s recommended settings. Never exceed the maximum pressure rating listed on the compressor nameplate.
How do I know if my pressure switch is bad?
Common signs of a bad pressure switch include the compressor not starting, running continuously without stopping, cycling on and off too frequently, or making clicking sounds without building pressure. You may also notice air leaks around the switch fitting. If you experience any of these symptoms, inspect the switch closely or test it with a multimeter.
Can a bad pressure switch damage my compressor?
Yes, a failing pressure switch can cause serious damage. A switch that fails in the closed position will let the compressor run continuously, which overheats the motor and can burn it out. A switch that fails in the open position prevents the compressor from starting at all. Either way, a faulty switch should be replaced promptly to protect your investment.
How often should I replace the pressure switch?
There is no set replacement schedule for pressure switches. Many last 10 years or more with proper maintenance. However, switches in dusty or humid environments may wear out faster. If you notice any of the common failure symptoms, inspect the switch and replace it if needed. Proactive replacement is cheaper than repairing motor damage caused by a stuck switch.
What is the difference between a pressure switch and a pressure gauge?
The pressure switch is an electrical control device that turns the motor on and off based on tank pressure. The pressure gauge is a purely mechanical instrument that displays the current pressure reading. They work together but serve very different purposes. The gauge shows you the numbers, while the switch acts on those numbers to control the compressor motor.
Frequently Asked Questions
What is ingersoll rand air compressor pressure switch?
ingersoll rand air compressor pressure switch is an important topic with many practical applications.


