Air Compressor Switch Replacement The Ultimate Guide
Air compressor switch replacement is a straightforward job that anyone can do with basic tools and a little know-how. Whether your compressor won’t start, keeps running, or trips the breaker, a faulty switch is often the culprit. This guide walks you through every step from diagnosis to installation, so you can get back to work fast.
Your air compressor is a workhorse. It powers nail guns, inflates tires, and runs spray equipment day after day. But when the switch goes bad, everything stops. You stand there staring at a machine that won’t start, and suddenly your whole project comes to a halt. This guide will show you exactly how to replace that switch and get back to work.
Switch replacement might sound intimidating, but it is one of the most common repairs you can do at home. With the right tools and a little patience, most people finish the job in under an hour. You do not need to be an electrician. You just need to follow the steps carefully and stay safe.
In this article, we cover everything from identifying a bad switch to wiring in the new one. We also share tips that pros use to avoid common pitfalls. By the end, you will feel confident tackling this repair yourself.
Key Takeaways
- Identify the problem first: A bad switch causes symptoms like failure to start, continuous running, or intermittent shutdowns.
- Match the right switch: Choose a replacement that matches your compressor’s voltage, amperage, and pressure settings.
- Safety comes first: Always disconnect power and discharge capacitors before starting any work on your compressor.
- Wiring matters: Proper wiring and secure connections prevent future problems and extend switch life.
- Test before you commit: Always test the new switch before reassembling the entire unit to save time and frustration.
- Know when to call a pro: Complex electrical issues or repeated switch failures may need a licensed technician.
📑 Table of Contents
- What Does an Air Compressor Switch Do?
- Signs Your Air Compressor Switch Is Failing
- Tools and Materials You Will Need
- Step-by-Step Switch Replacement Process
- Common Mistakes to Avoid
- When Should You Call a Professional?
- Tips to Extend Your Switch Lifespan
- How to Choose the Right Replacement Switch
- Final Thoughts
What Does an Air Compressor Switch Do?
The pressure switch is the brain of your compressor. It tells the motor when to turn on and when to turn off. When tank pressure drops to a set level, the switch closes the circuit and the motor starts. When pressure reaches the top limit, the switch opens and shuts the motor down.
Without a working switch, your compressor cannot do its job. It might run constantly, never build pressure, or refuse to start at all. Understanding how the switch works helps you diagnose problems faster and choose the right replacement part.
Types of Pressure Switches
Not all switches are the same. Different compressors use different types. Here are the most common ones you will encounter.
- Mechanical pressure switches: These use a diaphragm or bellows to detect pressure changes. They are simple, reliable, and found on most home compressors.
- Electronic pressure switches: These use sensors and digital controls. They offer more precise settings and are common on commercial units.
- Manual switches: These require you to flip a lever or knob to start and stop the compressor. They are less common but still found on older models.
Before buying a replacement, check your compressor model. Matching the right type of switch saves you time and avoids compatibility headaches.
Signs Your Air Compressor Switch Is Failing
How do you know the switch is the problem? Several telltale signs point to a failing switch. Catching these early saves you from bigger repairs down the road.
Compressor Won’t Start
If you press the start button and nothing happens, the switch could be at fault. The switch might be stuck in the open position, which breaks the circuit before power reaches the motor. This is one of the most common reasons a compressor refuses to fire up.
Compressor Keeps Running
Another clear sign is when the compressor never shuts off. The switch should open at the upper pressure limit and cut power to the motor. If it fails to open, the motor runs continuously. This wastes energy and can overheat the motor, leading to serious damage.
If your compressor keeps running, you should address it immediately. Check the reasons your air compressor keeps running to rule out other causes before replacing the switch.
Intermittent Operation
Sometimes the switch works inconsistently. The compressor starts, then stops randomly, or only works after you tap the switch housing. Intermittent behavior usually means internal contacts are worn or corroded. This is a clear signal that replacement time has come.
Unusual Clicking Sounds
A rapid clicking sound when you try to start the compressor often means the switch contacts are sticking or arcing. The switch tries to close but cannot make a solid connection. This not only prevents startup but can also damage the motor windings over time.
Tools and Materials You Will Need
Gathering everything before you start makes the job smooth and fast. You do not want to stop halfway through because you are missing a tool.
- Replacement pressure switch (matched to your compressor specs)
- Screwdrivers (flathead and Phillips)
- Wire strippers
- Multimeter for testing electrical connections
- Electrical tape or wire nuts
- Safety gloves and safety glasses
- Small container for storing screws
Having a multimeter on hand is especially important. It lets you verify that power is off before you touch any wires. Safety always comes first when working with electrical components.
Step-by-Step Switch Replacement Process
Now for the hands-on part. Follow these steps carefully and you will have a new switch installed in no time.
Step 1: Disconnect Power Completely
Unplug the compressor from the wall outlet. If your unit is hardwired, turn off the breaker that supplies power. Never work on a compressor that still has electrical power connected. This is the single most important safety rule.
After disconnecting power, wait a few minutes. Capacitors inside the compressor can hold a charge even after unplugging. If you are unsure how to safely discharge them, refer to your compressor manual or consult a professional.
Step 2: Locate and Remove the Old Switch
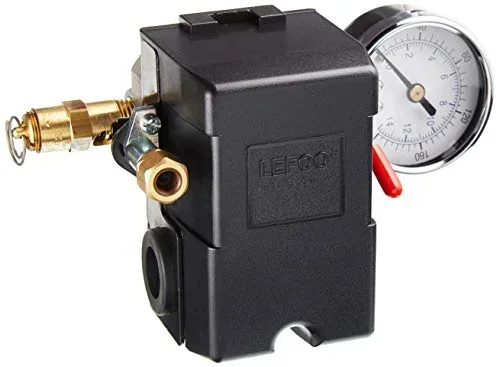
The pressure switch is typically mounted near the top of the compressor tank or on the motor housing. It connects to the electrical wiring and has an adjustment knob or screw for pressure settings. Look for a box-shaped component with wires entering from the side.
Take a photo of the wiring before you disconnect anything. This picture becomes your reference when installing the new switch. Use your screwdriver to remove the mounting screws and carefully pull the switch away from the housing.
Step 3: Disconnect the Wiring
Label each wire before removing it. Most switches have three to five wire connections. Common labels include L (line), T (terminal), and M (motor). Use small pieces of tape or a marker to mark each wire’s position.
Once labeled, loosen the terminal screws and pull the wires free. Set the old switch aside. Keep all your labels and photos handy for the next step.
Step 4: Install the New Switch
Mount the new switch in the same position as the old one. Secure it with the mounting screws. Then connect each wire to its matching terminal, using your photo as a guide. Tighten each terminal screw firmly but do not over-tighten, which can damage the connections.
After wiring, double-check every connection. Loose wires cause arcing, heat buildup, and potential fire hazards. Give each wire a gentle tug to confirm it is secure.
Step 5: Adjust Pressure Settings
Most replacement switches come with adjustable pressure ranges. Set the cut-in pressure (the level at which the compressor starts) and the cut-out pressure (when it stops) according to your needs. Refer to your compressor manual for the recommended settings.
Typical home compressors run between 90 and 120 PSI. Adjust the differential (the gap between cut-in and cut-out) to match your usage patterns. A narrower differential means more frequent cycling, while a wider differential reduces motor wear.
Step 6: Test the New Switch
Plug the compressor back in or turn the breaker on. Press the start button and watch the switch in action. The compressor should start when tank pressure drops and stop when it reaches the upper limit.
Listen for unusual sounds and watch for any sparking at the terminals. If everything looks and sounds normal, you have successfully completed your air compressor switch replacement.
Common Mistakes to Avoid
Even experienced DIYers make mistakes during switch replacement. Here are the most common ones and how to avoid them.
- Skipping the power disconnection: This is dangerous and can cause serious injury or death. Always verify power is off with a multimeter before touching any wires.
- Using the wrong switch: A switch with incorrect voltage or amperage ratings will fail quickly or cause damage. Always match the replacement to your compressor’s specifications.
- Over-tightening terminal screws: This strips the terminals or crushes the wire insulation, creating loose connections that can arc and overheat.
- Ignoring the differential setting: Setting the pressure range too wide or too narrow stresses the motor and reduces switch lifespan. Follow manufacturer recommendations.
- Forgetting to test before reassembly: Always test the new switch before putting the housing back on. It is much easier to fix a wiring mistake with easy access than after everything is reassembled.
When Should You Call a Professional?
Most switch replacements are DIY-friendly. But some situations call for a licensed technician. If you notice burned wiring, damaged motor windings, or repeated switch failures after replacement, there may be a deeper electrical issue at play.
Also, if your compressor uses a three-phase power supply or has complex control circuits, professional help is a smart choice. Testing compressor windings and other advanced diagnostics are best left to trained professionals who can ensure safety and proper function.
Remember, your safety matters more than saving a service call fee. When in doubt, call an expert.
Tips to Extend Your Switch Lifespan
A new switch should last for years if you take care of it. Here are simple habits that keep your switch and compressor running strong.
- Keep the area clean: Dust and debris around the switch can cause corrosion and short circuits. Wipe down the compressor regularly.
- Check electrical connections: Periodically inspect terminal connections for looseness or discoloration. Tighten any loose screws and replace any damaged wires.
- Avoid overloading the compressor: Running the compressor beyond its rated capacity stresses the motor and switch. Use the right compressor for each job.
- Drain moisture regularly: Moisture inside the tank can corrode internal components, including the switch mechanism. Drain your air compressor after each use to prevent buildup.
- Replace switches proactively: If your compressor is older than 10 years, consider replacing the switch as a preventive measure before it fails unexpectedly.
How to Choose the Right Replacement Switch
Not all replacement switches are created equal. Picking the right one ensures reliable performance and avoids compatibility issues.
Check Your Compressor Specifications
Look at the nameplate on your compressor for voltage, amperage, and horsepower ratings. These numbers tell you exactly what type of switch you need. Buying a switch with matching specs guarantees a proper fit and safe operation.
Consider the Pressure Range
Make sure the replacement switch supports your compressor’s pressure range. If your compressor operates at 150 PSI, do not install a switch rated for only 100 PSI. The switch will fail under pressure and could create a dangerous situation.
OEM vs. Aftermarket Switches
Original Equipment Manufacturer (OEM) switches are designed specifically for your compressor model. They offer the best fit and reliability. Aftermarket switches are more affordable and often work just as well, but quality varies between brands. Read reviews and check specifications carefully before buying.
Final Thoughts
Air compressor switch replacement is one of the most useful skills you can learn as a homeowner or hobbyist. It saves you money, gets your compressor back online fast, and gives you confidence to tackle other repairs. The process is simple, the tools are basic, and the satisfaction of fixing it yourself is hard to beat.
Take your time, follow each step carefully, and always prioritize safety. With the right replacement switch and a little care, your compressor will be running like new again in no time. Now get out there and finish that project.
Frequently Asked Questions
How do I know if my air compressor switch is bad?
Common signs include the compressor not starting, running continuously without shutting off, intermittent operation, or unusual clicking sounds. If you notice any of these symptoms, the pressure switch is likely the culprit and may need replacement.
Can I replace the switch myself or should I hire a professional?
Most switch replacements are straightforward DIY jobs that require basic tools and electrical safety knowledge. However, if you are uncomfortable working with electrical components or your compressor has complex wiring, it is best to hire a licensed technician for safety.
How much does an air compressor switch cost?
Replacement switches typically range from $20 to $80 depending on the type and brand. Mechanical switches are more affordable, while electronic switches with digital controls cost more. The total cost remains low compared to hiring a professional repair service.
What should I do if the new switch keeps failing?
Repeated switch failures often point to an underlying issue such as moisture in the tank, corroded wiring, or an overworked motor. Check your compressor’s electrical connections, drain moisture regularly, and ensure you are using the correct switch rating for your unit.
How long does a pressure switch typically last?
A quality pressure switch can last 10 to 15 years with proper maintenance. However, factors like moisture exposure, electrical surges, and overuse can shorten its lifespan. Regular inspection and timely replacement help keep your compressor running reliably.
Is it safe to adjust the pressure settings on a new switch?
Yes, it is safe to adjust pressure settings as long as you follow the manufacturer’s recommended range. Never exceed the maximum pressure rating for your compressor tank. Proper adjustment ensures optimal performance and prevents damage to the motor and switch components.