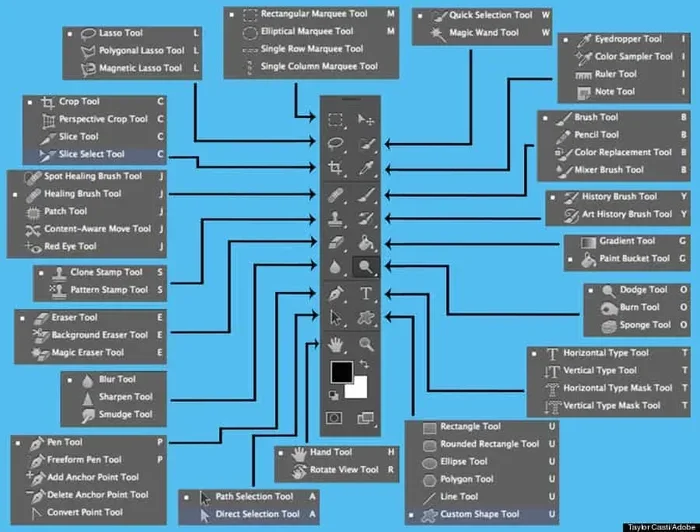
How Do You Select Tools in Photoshop for Beginners
Selecting tools in Photoshop is the first skill every beginner needs to master. This guide walks you through the Photoshop toolbar, explains each tool in plain language, and shares keyboard shortcuts that speed up your workflow. You will learn how to choose the right tool for any editing task and avoid common mistakes that slow you down.
Photoshop can feel overwhelming the first time you open it. Dozens of icons crowd the screen. Menus stretch in every direction. And the toolbar? It looks like a puzzle waiting to be solved. But here is the good news. Learning how to select tools in Photoshop is simpler than most people think. Once you understand the layout and a few basic rules, everything starts to make sense. This guide breaks it all down for you. No jargon. No confusing steps. Just clear, practical advice that gets you editing faster.
Whether you are picking up Photoshop for the first time or you have been dabbling but feel stuck, this article is for you. We will walk through every major tool group. We will show you how to find what you need in seconds. And we will share shortcuts that turn you from a hesitant beginner into a confident editor. Let us dive in and make Photoshop feel friendly.
Key Takeaways
- Know your toolbar: The Photoshop toolbar holds all your essential editing and selection tools in one place.
- Use keyboard shortcuts: Shortcuts like V for Move and M for Marquee save you tons of time.
- Group tools by purpose: Selection tools, painting tools, and shape tools each have their own section.
- Customize your workspace: You can rearrange and save tool layouts that match your editing style.
- Avoid tool overload: Start with a few core tools and build your skills gradually.
- Practice makes permanent: Regular use of the tools panel builds muscle memory and confidence.
📑 Table of Contents
- Understanding the Photoshop Interface Before You Pick a Tool
- The Essential Selection Tools Every Beginner Should Know
- How to Access and Choose Tools from the Toolbar
- Keyboard Shortcuts That Make Tool Selection Effortless
- Customizing Your Tool Workspace for Better Workflow
- Common Mistakes Beginners Make When Selecting Tools
- Building Your Photoshop Skills Step by Step
- Expert Insights on Mastering Tool Selection
- Key Takeaways
- Frequently Asked Questions
- Conclusion
Understanding the Photoshop Interface Before You Pick a Tool
Before you can select tools in Photoshop, you need to know where they live. Photoshop has a clean structure once you see it. The screen is divided into a few key areas. The toolbar sits on the left side. It is your main control center. The panels on the right hold options like layers, colors, and history. The top bar changes depending on which tool you pick. It shows settings and adjustments for that specific tool.
The Toolbar: Your Go-To Place for Every Tool
The Photoshop toolbar is the vertical column of icons on the left side of your screen. It contains all the tools you need for editing, selecting, drawing, and more. Some tools show a small arrow in the bottom corner of their icon. That arrow means there are hidden tools grouped underneath. Click and hold to reveal them. For example, the selection tools group includes the Marquee tool, the Lasso tool, and the Magic Wand. They all live together. You just need to know where to look.
The toolbar is organized by purpose. Selection tools sit near the top. Painting and drawing tools are in the middle. Navigation tools like the Hand and Zoom tools are toward the bottom. This grouping is intentional. Adobe designed it so you can find tools by what you want to do. Once you notice the pattern, choosing the right tool becomes second nature.
The Options Bar: What Changes When You Pick a Tool
Directly below the top menu bar sits the Options bar. It sits right above the toolbar. When you click a tool, this bar updates. It shows the settings that matter for that specific tool. For instance, if you pick the Brush tool, the Options bar lets you choose brush size, hardness, and opacity. If you pick the Crop tool, it shows aspect ratio options and straightening controls. The Options bar is your best friend. It tells you exactly what each tool can do.
The Essential Selection Tools Every Beginner Should Know
Selection tools are the bread and butter of photo editing tools in Photoshop. They let you isolate parts of an image. You can then edit just that area without touching the rest. There are several selection tools, and each one works best for different situations.
The Marquee Tools: For Simple Geometric Selections
The Marquee tools let you draw straight-edged selections. The Rectangular Marquee makes square or rectangle selections. The Elliptical Marquee makes circle or oval selections. These are perfect for cutting out a product photo or selecting a sky. To use them, simply click and drag over the area you want. Hold the Shift key to make a perfect square or circle.
The Lasso Tools: For Freehand and Precision Work
The Lasso tool gives you more freedom. The standard Lasso lets you draw any shape by hand. The Polygonal Lasso snaps to straight lines. It is great for selecting buildings or furniture with sharp edges. The Magnetic Lasso is a smart option. It snaps to the edges of objects automatically. This saves a ton of time when you are selecting something with a clear outline.
The Quick Selection and Magic Wand Tools
The Quick Selection tool is a favorite among beginners. You just brush over an area, and Photoshop guesses the edges. It works really well on objects with solid colors. The Magic Wand tool selects based on color similarity. Click on a solid background, and it selects all pixels of that color. Both tools are fast and easy. They are perfect for simple cutouts and background removal.
The Move Tool: Your Daily Driver
Do not overlook the Move tool. It is one of the most used tools in all of Adobe Photoshop. It lets you drag layers, selections, and entire objects around your canvas. The shortcut key is V. Press V anytime you want to move something. It is simple, but incredibly powerful when combined with other tools.
How to Access and Choose Tools from the Toolbar
Now that you know what the tools do, let us talk about how to actually find them. Selecting tools in Photoshop is straightforward once you know the methods.
Clicking Tools Directly
The simplest way is to click a tool icon in the toolbar. Scroll through the list on the left. Each icon represents a tool or a group of tools. If you see a small arrow, there are more tools hidden there. Click and hold to expand the group. Then click the tool you want. This works fine for beginners. But as your speed increases, you will want a faster method.
Using Keyboard Shortcuts
Keyboard shortcuts are the fastest way to select tools in Photoshop. Every tool has a letter assigned to it. Here are the most important ones to memorize:
- V — Move Tool
- M — Marquee Tool
- L — Lasso Tool
- W — Magic Wand and Quick Selection
- B — Brush Tool
- E — Eraser Tool
- C — Crop Tool
- T — Text Tool
- G — Gradient Tool
- Z — Zoom Tool
Press any of these letters and the corresponding tool activates instantly. If a group has multiple tools, press the letter again to cycle through them. This trick alone will make you feel like a power user within minutes.
Using the Tools Menu at the Top
You can also access tools from the top menu bar. Go to Tools and hover over a category. A dropdown shows all tools in that group. This method is helpful when you forget a shortcut. It is slower than clicking or using keys, but it works well when you are learning.
Keyboard Shortcuts That Make Tool Selection Effortless
Photoshop shortcuts are a game changer. They let you work without ever taking your hands off the keyboard. Once you build the habit, you will wonder how you ever edited without them.
The Quick Trick: Hold Shift to Cycle Tools
Here is a tip most beginners miss. When you press a tool shortcut and there are multiple tools in that group, hold Shift and press the same letter again. This cycles through the hidden tools. For example, press M for the Rectangular Marquee. Then hold Shift and press M again to switch to the Elliptical Marquee. Keep pressing to cycle through all options.
Bonus Shortcuts for Editing After Selection
Once you have made a selection, these shortcuts help you act on it fast:
- Ctrl + C (Windows) or Cmd + C (Mac) — Copy the selection
- Ctrl + V or Cmd + V — Paste into a new layer
- Ctrl + Shift + I or Cmd + Shift + I — Inverse the selection
- Ctrl + D or Cmd + D — Deselect and free up your canvas
- Ctrl + T or Cmd + T — Free transform for resizing and rotating
These shortcuts pair perfectly with your selection tools. They turn a basic selection into a powerful editing move. Practice them together until they feel natural.
Customizing Your Tool Workspace for Better Workflow
Photoshop lets you tailor the workspace to your needs. This is especially helpful when you are learning how to select tools in Photoshop efficiently.
Rearranging the Toolbar
You cannot move individual tools around the toolbar. But you can expand tool groups to see all options clearly. You can also separate the toolbar into two columns if you have a wide screen. Go to Edit, then Toolbar, and choose to expand the toolbar. This gives you more room to see each tool without scrolling.
Saving Custom Workspaces
Photoshop lets you save workspace layouts. If you edit photos often, you might want the toolbar on the left and the layers panel on the right. If you design graphics, you might prefer different panel arrangements. Once you set up your ideal layout, go to Window and choose Workspace, then Save Workspace. Give it a name. Next time you open Photoshop, your custom setup is right there waiting.
Adding Tools to the Quick Actions Bar
The Quick Actions bar sits at the top of the screen. It gives you one-click access to common tasks like removing a background or adjusting a subject. While these are not traditional tools, they use the same selection tools behind the scenes. They are a great shortcut for beginners who want fast results without learning every tool first.
Common Mistakes Beginners Make When Selecting Tools
Everyone makes mistakes when starting with Photoshop. The good news is that most of them are easy to avoid.
Skipping the Options Bar
One of the biggest mistakes is picking a tool and immediately clicking on the canvas. The Options bar holds important settings for each tool. For example, the Brush tool lets you set the size and hardness. If you skip this step, you might get a tiny, hard brush when you needed a soft, large one. Always glance at the Options bar after selecting a tool. It takes two seconds and saves a lot of frustration.
Forgetting to Duplicate Layers
When you use selection tools to cut or move parts of an image, always work on a duplicate layer. Press Ctrl + J (Windows) or Cmd + J (Mac) to duplicate the active layer first. This protects your original image. If something goes wrong, you can always go back to the untouched layer.
Overcomplicating Simple Tasks
Beginners sometimes reach for the most complex tool when a simple one would work. For example, they might use the Pen tool for a basic straight-line selection when the Rectangular Marquee does the job perfectly. Start simple. Use the Magic Wand or Quick Selection for straightforward tasks. Save the advanced tools for when you really need them.
Not Using Zoom to Check Your Work
Selection accuracy matters. If you are working on a small detail, zoom in before you make your selection. Press Z for the Zoom tool, then click on the area you want to see closer. This gives you precision and prevents sloppy edges.
Building Your Photoshop Skills Step by Step
The best way to get comfortable with Photoshop tools is through practice. Try these steps to build your confidence over time.
- Start with the Move and Marquee tools. Practice selecting and moving simple shapes on a blank canvas.
- Move to the Lasso and Magic Wand. Try selecting objects in real photos.
- Combine selections with edits. Select an area, then change its brightness or color.
- Learn one shortcut per day. Add a new keyboard shortcut to your routine each day.
- Experiment with the toolbar daily. Open Photoshop for just ten minutes and try a different tool each time.
Within a few weeks, you will find yourself reaching for the right tool without thinking. That is when Photoshop starts to feel fun instead of frustrating.
Expert Insights on Mastering Tool Selection
Experienced Photoshop users agree on a few key principles. First, less is more. You do not need to know every single tool to create great work. Focus on the ones that match your editing goals. Second, consistency beats intensity. Ten minutes of daily practice beats a three-hour weekend session. Your muscle memory builds through repetition. Third, use the help menu. Photoshop has a built-in search bar at the top. Type in any tool name and it shows you where it is and how to use it. This is a free resource most beginners never take advantage of.
Another pro tip is to watch how the cursor changes. When you hover over a tool icon, a tooltip appears showing the tool name and its shortcut. This is a great way to discover tools you did not know existed. The more you explore, the more tools you will find that make your workflow smoother.
Key Takeaways
- The Photoshop toolbar is your starting point: All tools are organized by purpose on the left side of the screen.
- Selection tools are your foundation: Marquee, Lasso, Magic Wand, and Quick Selection cover most basic needs.
- Keyboard shortcuts save time: Memorize the top shortcuts and use Shift to cycle through grouped tools.
- The Options bar matters: Always check it after selecting a tool to adjust settings properly.
- Customize your workspace: Save layouts that match your editing style for a faster workflow.
- Avoid common mistakes: Duplicate layers, check the Options bar, and keep things simple at first.
- Practice builds confidence: Daily use of the tools panel makes selecting tools in Photoshop feel effortless.
Frequently Asked Questions
How do I find a specific tool if I forget its name?
Use the search bar at the top of Photoshop. Type the tool name or what you want to do, and Photoshop will highlight the tool in the toolbar. You can also press the tool’s keyboard shortcut directly. For example, pressing B instantly selects the Brush tool.
Can I add more tools to the Photoshop toolbar?
Yes. Go to Edit, then Toolbar. In the dialog box, you will see a list of tools on the right side that are not currently in your toolbar. Drag any tool from the right column to the left column to add it. This is great for tools you use often but cannot find easily.
What is the easiest selection tool for beginners?
The Quick Selection tool is the easiest to start with. You simply brush over an area and Photoshop automatically detects the edges. It works well on most photos and requires no technical skill. The Magic Wand tool is also beginner-friendly for selecting solid-color backgrounds.
How do I switch between tools quickly without using the mouse?
Use keyboard shortcuts. Each tool has a letter assigned to it. Press the letter to activate the tool instantly. If you need to switch between tools in the same group, hold Shift and press the same letter again to cycle through them.
Should I learn all the tools at once or one at a time?
Start with a few core tools and learn them well. The Move, Marquee, Lasso, Brush, and Crop tools cover most beginner tasks. Once you are comfortable with these, add more tools to your toolkit. Learning gradually helps you retain information and avoid feeling overwhelmed.
What should I do if my toolbar is missing or hidden?
Go to the top menu and click Window, then Tools. This will bring the toolbar back to the left side of your screen. If your workspace looks scrambled, go to Window, then Workspace, and choose Essentials to reset to the default layout.
Conclusion
Learning how to select tools in Photoshop does not have to be scary. The toolbar is organized with purpose. The shortcuts are easy to learn. And the Options bar gives you control over every detail. Start with the basic selection tools and a handful of keyboard shortcuts. Practice a little each day. Soon, you will move through Photoshop with confidence and speed. The tools are waiting for you. All you have to do is start exploring.
Remember, every expert was once a beginner. The fact that you are learning how to choose the right tools in Photoshop puts you ahead of the curve. Keep experimenting, keep practicing, and most importantly, have fun with it. Your creative journey in Photoshop starts right here, right now.