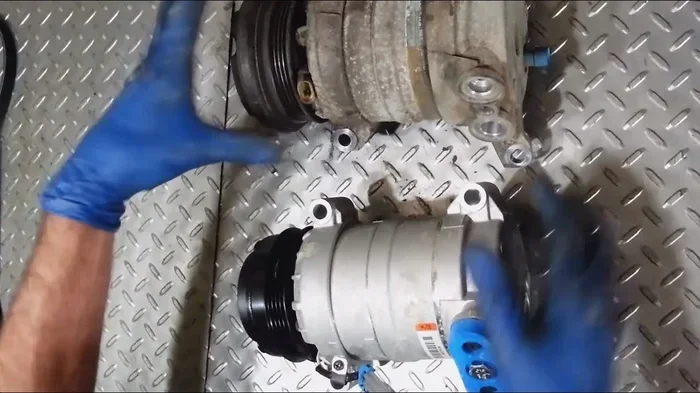
How to Remove an AC Compressor From Your Car Properly
Removing an AC compressor from your car is a manageable DIY task when you have the right tools and follow proper safety steps. This guide walks you through every stage, from recovering refrigerant to disconnecting electrical lines and unbolting the unit. Whether you are replacing a faulty compressor or upgrading your car AC system, these instructions will help you get the job done right.
Working on your car air conditioning system can feel intimidating at first. But removing an AC compressor does not have to be a nightmare. With the right approach and a little patience, you can tackle this job in your home garage. This guide breaks down the entire process into simple, easy-to-follow steps.
Maybe your compressor has failed and you need to replace it. Perhaps you are upgrading to a newer unit or rebuilding the system. Whatever the reason, knowing how to properly remove the compressor saves you money and builds your automotive skills. Let us dive in.
Key Takeaways
- Always recover refrigerant first: Never release refrigerant into the atmosphere. It is illegal in many places and harmful to the environment.
- Gather all tools beforehand: Having everything ready saves time and prevents frustration during the removal process.
- Label every connection: Taking photos and labeling lines ensures correct reassembly or installation of a new unit.
- Watch for rusted bolts: Apply penetrating oil and let it sit to avoid breaking bolts during removal.
- Disconnect the battery first: This is a critical safety step that prevents electrical shorts and shocks.
- Know when to call a pro: Some steps, like refrigerant recovery, require certified equipment and training.
📑 Table of Contents
- Why Remove an AC Compressor From Your Car?
- Tools and Materials You Will Need
- Safety First: Precautions Before You Start
- Step-by-Step Guide to Removing an AC Compressor
- Common Mistakes to Avoid During AC Compressor Removal
- Tips for a Smooth Removal Process
- What to Do After the Compressor Is Removed
- When to Call a Professional
- Final Thoughts on AC Compressor Removal
Why Remove an AC Compressor From Your Car?
There are several reasons car owners need to remove their AC compressor. Understanding your specific situation helps you plan the job better.
- Compressor failure: A seized or noisy compressor often needs full replacement.
- System overhaul: Some rebuilds require removing the compressor to flush the entire automotive AC system.
- Upgrades: You might be swapping to a high-performance or electric compressor.
- Engine work: Sometimes the compressor gets in the way during engine swaps or major repairs.
- Leak repairs: A compressor leak may require removal to access and fix surrounding components.
No matter the reason, the removal process follows the same basic principles. The key is to work carefully and never skip safety steps.
Tools and Materials You Will Need
Before you start, gather everything you need. Running back and forth to the garage shelf kills momentum and wastes time. Here is a complete list of what you should have ready.
Essential Tools
- Socket set (metric and standard sizes)
- Ratchet and extension bars
- Serpentine belt tool or breaker bar
- Wrench set (combination and flare nut wrenches)
- Screwdrivers (flathead and Phillips)
- Penetrating oil (such as WD-40 or PB Blaster)
- Safety glasses and gloves
- Torque wrench
- Jack and jack stands or ramps
Specialty Equipment
- Refrigerant recovery machine (for recovering AC refrigerant)
- AC manifold gauge set
- Labeling tape or marker
- Camera or phone for photos
- Drain pan for residual fluids
- New O-rings and seals (if reusing the compressor later)
Some of these tools, like the refrigerant recovery machine, require professional certification in many areas. You can always take your car to a shop for the refrigerant recovery step and handle the rest yourself. The cost of a how much does a generator cost setup or similar shop equipment varies, but many auto parts stores offer refrigerant recovery services for a reasonable fee.
Safety First: Precautions Before You Start
Safety is not optional when working on an automotive AC system. The refrigerant inside is under high pressure and can cause serious injury if handled improperly. Follow these precautions every single time.
Disconnect the Battery
Always disconnect the negative battery terminal first. This prevents electrical shorts and protects you from accidental activation of the AC system. Use a wrench to loosen the nut and pull the cable off the post. Secure it away from the battery so it cannot accidentally touch.
Recover the Refrigerant Properly
This is the most important safety and legal step. Never attempt to release refrigerant into the air. It contains chemicals that harm the ozone layer and are illegal to vent in most places. Use a certified refrigerant recovery machine to pull the gas out of the system. Many auto shops and parts stores will do this for you.
Let the System Cool Down
Do not work on the AC system immediately after running it. Components can be hot and under pressure. Wait at least 30 minutes after turning off the engine before you start any work.
Protect Your Body
Wear safety glasses to protect your eyes from any residual refrigerant or debris. Use chemical-resistant gloves when handling refrigerant lines. Work in a well-ventilated area to avoid inhaling any fumes.
Step-by-Step Guide to Removing an AC Compressor
Now that you are prepared and safe, let us walk through the actual removal process. Follow these steps in order for the best results.
Step 1: Prepare the Vehicle
Park your car on a flat, level surface. Engage the parking brake and place wheel chocks behind the rear tires. If you need to lift the vehicle, use jack stands for support. Never work under a car supported only by a jack. Once the vehicle is secure, open the hood and locate the AC compressor. It is typically mounted near the front of the engine, driven by the serpentine belt.
Step 2: Take Photos and Label Everything
This simple step saves hours of confusion later. Use your phone to take clear photos of the compressor, all connections, and the routing of the refrigerant lines. Label each hose with tape or a marker. Note which line is the high-pressure side and which is the low-pressure side. The high-pressure line is usually smaller and feels warm or hot during operation. The low-pressure line is larger and feels cool.
Step 3: Remove the Serpentine Belt
Use a serpentine belt tool or a breaker bar to rotate the automatic tensioner. This releases the tension on the belt. Slide the belt off the compressor pulley and set it aside. Keep the belt in a safe place where it will not get damaged or contaminated.
Step 4: Disconnect the Electrical Connector
The compressor has an electrical plug that controls the clutch. Unclip the connector carefully. Some connectors have a locking tab that you need to press first. Once disconnected, tuck the wire out of the way so it does not get in your working area.
Step 5: Disconnect the Refrigerant Lines
Place a drain pan underneath the compressor to catch any residual refrigerant. Use a flare nut wrench to disconnect the refrigerant lines. These fittings can be tight, so apply steady pressure. Avoid using pliers, as they can strip the soft aluminum fittings. If any lines are stuck, apply penetrating oil and wait 10 to 15 minutes before trying again.
Step 6: Remove the Mounting Bolts
The compressor is held in place by several bolts. These are often exposed to road grime and moisture, so they may be rusted. Spray penetrating oil on each bolt and let it soak for at least 10 minutes. Then use your socket set to remove them one at a time. Keep all bolts in a labeled container so you do not lose them.
Step 7: Extract the Compressor
Once all bolts and connections are removed, carefully pull the compressor free. It can be heavy, so use both hands and a helper if needed. Set it on a clean, stable surface. Inspect the mounting surface on the engine for any debris or old gasket material. Clean it thoroughly before installing a new compressor.
Common Mistakes to Avoid During AC Compressor Removal
Even experienced DIYers make mistakes. Knowing what to avoid keeps you safe and prevents costly errors.
Skipping Refrigerant Recovery
This is the number one mistake people make. Releasing refrigerant is illegal and environmentally dangerous. Always recover the refrigerant using proper equipment before disconnecting any lines.
Forgetting to Label Connections
Without labels and photos, you may reconnect lines incorrectly. This can cause serious damage to the AC system and lead to expensive repairs. Take your time with this step.
Using the Wrong Tools
Stripped fittings are a common problem. Using pliers instead of proper flare nut wrenches damages the soft aluminum. Invest in the right tools before you start the job.
Rushing the Bolt Removal
Rusted bolts need penetrating oil and patience. Forcing them breaks the bolt head, which makes extraction much harder. Apply oil, wait, and try again gently.
Not Checking the Serpentine Belt Tensioner
A worn tensioner can cause the belt to slip after reinstallation. Inspect the tensioner while the belt is off. Replace it if it shows signs of wear or stiffness.
Tips for a Smooth Removal Process
A few extra tips can make your compressor removal job much easier and more successful.
- Work with a partner: An extra pair of hands makes holding heavy components much easier.
- Keep a parts tray: Organize bolts and small parts by their location. This prevents mix-ups during reassembly.
- Clean as you go: Wipe down components before disconnecting them. Clean surfaces seal better when you reinstall.
- Take your time: Rushing leads to mistakes. Give yourself plenty of time to complete the job without pressure.
- Consult your service manual: Every car is slightly different. Your vehicle-specific manual provides exact torque specs and diagrams.
While you are working on your vehicle, you might also consider other maintenance tasks. For example, if you need portable power for tools or lighting in the garage, understanding how to size a generator helps you choose the right unit for your needs. Many car enthusiasts keep a backup generator for their workshop, especially during power outages or when working on remote projects.
What to Do After the Compressor Is Removed
Once the old compressor is out, you have several options depending on your situation.
- Install a new compressor: If your original unit failed, a new replacement is the most straightforward path. Make sure to install new O-rings and seals during reassembly.
- Rebuild the old compressor: Some compressors can be rebuilt with a new clutch and internal components. This is a cost-effective option if the pump itself is still in good condition.
- Convert to a different system: Some car owners remove the AC system entirely and convert to aftermarket cooling solutions.
- Store or sell the old unit: A functional compressor can be resold or used as a spare part for another vehicle.
If you are planning any workshop upgrades, you might also look into your power setup. Understanding how much generator do I need for your garage tools ensures you have reliable power for future automotive projects. A properly sized generator keeps your tools running smoothly without overloading your electrical system.
After the compressor is removed, you should also inspect the surrounding components. Look at the condenser, evaporator, and hoses for any signs of wear or damage. Catching problems early prevents bigger issues down the road.
When to Call a Professional
There is no shame in calling a professional mechanic. Some aspects of AC compressor removal require specialized equipment and certification. If you are uncomfortable with refrigerant recovery or if the compressor is severely seized and won’t budge, a professional can handle it safely. Many shops charge a reasonable fee for refrigerant recovery alone, which often comes to around the same cost as purchasing a recovery machine for a one-time job.
Also, if you are replacing the compressor, a professional can properly evacuate and recharge the system. This ensures the car AC system works efficiently and lasts for years. A poorly recharged system can cause premature wear on the new compressor and reduce cooling performance.
Final Thoughts on AC Compressor Removal
Removing an AC compressor from your car is a rewarding DIY project that saves money and builds your mechanical confidence. The process requires patience, the right tools, and a strong commitment to safety. Always recover refrigerant properly, label every connection, and take your time with each step.
Whether you are replacing a failed unit, rebuilding the system, or just learning more about your vehicle, this guide gives you everything you need to get started. Remember that every car is different, so consult your service manual for vehicle-specific details. And do not hesitate to call a professional when a step feels beyond your comfort level.
The skills you gain from this job carry over to many other automotive repairs. Once you understand how the AC system works and how to safely remove components, you are better equipped to handle future maintenance and upgrades. So grab your tools, follow these steps, and enjoy the satisfaction of a job well done.
Also, if you are thinking about powering your garage or workshop, understanding the cost of equipment like a portable power source can be helpful. Many people ask about how much does a generator cost for home or shop use, and the answer varies widely depending on the size and features you need. Having reliable power in your workspace makes any automotive project smoother and more enjoyable.
Frequently Asked Questions
Can I remove an AC compressor without recovering the refrigerant?
No, you should never skip refrigerant recovery. Releasing refrigerant into the atmosphere is illegal in most places and harmful to the environment. Always use a certified recovery machine or take your vehicle to a shop that can handle this step safely.
How long does it take to remove an AC compressor?
For most people, the entire process takes between one and three hours. Experienced DIYers may finish faster, while those new to automotive repairs should allow extra time. The refrigerant recovery step alone can take 30 to 60 minutes depending on the system.
Do I need special tools to remove an AC compressor?
You need standard socket wrenches, a serpentine belt tool, and a flare nut wrench set. The most specialized item is a refrigerant recovery machine, which many auto parts stores offer for rent or will handle for you. A torque wrench is also helpful for proper bolt tightening during reassembly.
Can I reuse the old compressor after removing it?
It depends on the condition. If the compressor is not seized and the internal components are intact, a rebuild may be possible. However, replacing it with a new or remanufactured unit is usually more reliable and cost-effective in the long run.
What should I do with the old AC compressor?
You can sell it to a salvage yard, give it to a rebuilder, or take it to an auto parts store that accepts used components. Many shops will take your old compressor when you purchase a replacement, as they can rebuild or recycle it properly.
Is it safe to work on the AC system without professional certification?
Working on the mechanical components of the AC system is safe and legal for most DIYers. However, handling refrigerant requires EPA certification in the United States. You can avoid this requirement by having a certified shop recover the refrigerant before you begin your work.