How to Copy and Paste Plugins in Pro Tools the Easy Way
Copying and pasting plugins in Pro Tools is one of the fastest ways to speed up your mixing workflow. Whether you are working on a vocal chain, drum bus, or full session, knowing how to duplicate plugin chains keeps your settings consistent across tracks. This guide walks you through every method so you can work smarter, not harder, in your digital audio workstation.
Working in a digital audio workstation can feel overwhelming at first. There are so many tools, buttons, and windows competing for your attention. But once you learn a few key shortcuts and workflows, everything starts to click. One of those game-changing skills is knowing how to copy and paste plugins in Pro Tools. This simple technique can shave hours off your mixing sessions and keep your sound consistent across tracks.
Whether you are a beginner just getting started with audio production or a seasoned engineer looking to streamline your workflow, this guide has you covered. We will walk through every method step by step. You will learn keyboard shortcuts, preset tricks, and best practices that professional producers use every day. By the end, you will wonder how you ever worked without these techniques.
Key Takeaways
- Plugin copying saves hours: You can reuse exact settings across multiple tracks without rebuilding chains from scratch.
- Multiple methods exist: You can copy plugins using keyboard shortcuts, the plugin window, or by saving and loading presets.
- AU and VST plugins work differently: Understand the format differences to avoid confusion when moving between Mac and Windows.
- Plugin chains can be saved as presets: This lets you recall complex signal chains in seconds on any track.
- Always check latency settings: When pasting plugins, latency compensation can affect your mix timing.
- Organization matters: Naming your plugin chains and presets keeps sessions clean and easy to navigate.
📑 Table of Contents
- Why Copying Plugins in Pro Tools Matters
- Method 1: Copy and Paste Using Keyboard Shortcuts
- Method 2: Drag and Drop Between Tracks
- Method 3: Saving and Loading Plugin Presets
- Understanding Plugin Formats: AU vs VST vs AAX
- Common Mistakes to Avoid When Copying Plugins
- Pro Tips for Efficient Plugin Workflow in Pro Tools
- Conclusion
Why Copying Plugins in Pro Tools Matters
When you spend time dialing in the perfect mix settings on one track, you do not want to repeat that work from zero on the next track. Copying plugins in Pro Tools lets you transfer your exact settings instantly. This is especially useful when you are mixing multiple vocal takes, drum layers, or guitar tracks that need a similar sound.
Think about a typical mixing session. You might have twelve vocal tracks, each needing the same basic chain of a de-esser, EQ, and compressor. Without copying plugins, you would have to load each plugin individually and adjust every parameter by hand. That is tedious and prone to human error. With the right technique, you can duplicate an entire plugin chain in seconds.
Time Savings in Real-World Sessions
Let us put this into perspective. A basic plugin chain might include four or five plugins. Loading each one, adjusting settings, and making sure they work together takes several minutes per track. Now multiply that by twenty tracks. You are looking at over an hour of repetitive work. Copying and pasting cuts that time down to just a few seconds.
Professional mixing engineers rely on this workflow constantly. It is not a shortcut to take lightly. It is a core part of how modern audio production gets done efficiently. The faster you can build consistent chains, the more time you have to focus on creativity and sound design.
Method 1: Copy and Paste Using Keyboard Shortcuts
The fastest way to copy and paste plugins in Pro Tools is by using keyboard shortcuts. This method works for both audio and MIDI tracks and is the go-to technique for most producers.
Step-by-Step Guide
Follow these steps to copy plugins between tracks using your keyboard:
- Select the track that has the plugins you want to copy. Click on the track header to highlight it.
- Press Ctrl+C (Windows) or Cmd+C (Mac) to copy the entire track including its plugins.
- Click on the destination track where you want the plugins pasted.
- Press Ctrl+V (Windows) or Cmd+V (Mac) to paste.
- Verify the plugins are loaded correctly by opening the track’s mixer view.
This method copies all plugins, their settings, and the order they appear in the signal chain. It is the most complete copy method available in Pro Tools. However, there is one thing to watch out for. If the destination track has a different input or output configuration, you may need to adjust routing after pasting.
Copying Only Plugins Without Track Data
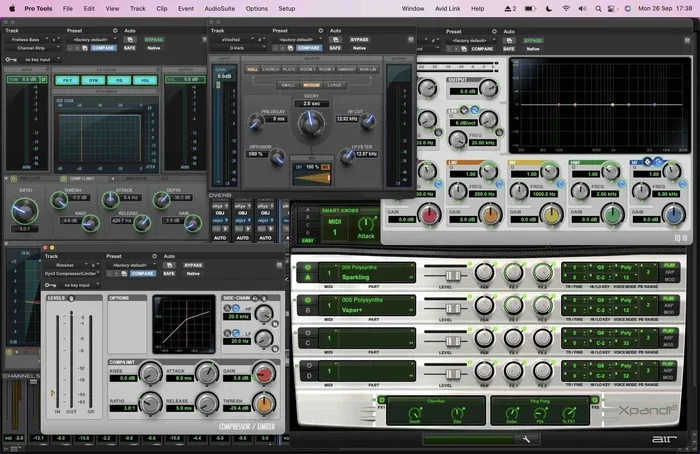
If you only want the plugins and not the track settings, there is a slightly different approach. You can open the plugin window on the source track, select the plugins in the chain, and use the copy function. Then paste them into a new or existing track chain. This gives you more control over what gets transferred.
Another option is to use the Plugin Manager in Pro Tools. This built-in tool lets you manage, save, and load plugin chains across sessions. It is especially handy when you are working on multiple projects that share similar processing chains.
Method 2: Drag and Drop Between Tracks
Not everyone loves keyboard shortcuts, and that is perfectly fine. Pro Tools also supports a drag-and-drop method for moving plugins between tracks. This visual approach can be more intuitive for beginners.
How to Drag Plugins Between Tracks
Here is how the drag-and-drop method works in practice:
- Open the Mixer view so you can see all your tracks and their plugin inserts.
- Click on the plugin slot you want to copy. Hold down the mouse button.
- Drag the plugin to the corresponding slot on the destination track.
- Release the mouse button to drop the plugin in place.
- Repeat for each plugin in the chain if you are moving multiple ones.
The drag-and-drop method works well when you are moving one or two plugins at a time. For larger chains, the keyboard shortcut method is faster. But for quick moves, dragging feels natural and keeps you in visual contact with your session.
Copying Plugin Chains Using the Edit Menu
You can also use the Edit menu at the top of Pro Tools to copy and paste plugins. Select the track, go to Edit, choose Copy, then navigate to the destination track and select Paste. This method is slower than shortcuts but useful if you prefer menu-driven navigation. It also works well on devices where keyboard shortcuts may not be as accessible.
Method 3: Saving and Loading Plugin Presets
Sometimes you want to reuse a plugin chain across different sessions or even different projects. In these cases, saving your plugins as presets is the best approach. Presets let you store your exact settings and load them whenever you need them.
How to Save a Plugin Preset
Saving a preset is straightforward. Open the plugin you want to save. Look for the preset menu, usually located at the top of the plugin window. Click on it and choose Save Preset. Give your preset a descriptive name so you can find it later. You can save presets for individual plugins or for entire chains if the plugin supports it.
Most popular plugins like Waves, FabFilter, and iZotope support preset saving. Once saved, your presets appear in the preset browser and are available in any Pro Tools session. This is incredibly powerful for producers who work on multiple projects with similar sonic requirements.
Loading Presets on New Tracks
To load a preset on a new track, insert the plugin and open the preset menu. Browse to your saved preset and click to load it. The plugin will restore all the settings you saved earlier. This method is perfect for recurring tasks like vocal processing, bass enhancement, or drum bus compression.
You can also create your own preset folders to keep things organized. For example, you might have a folder for vocal presets, another for guitar, and another for mastering chains. Staying organized with your presets saves you from scrolling through endless lists every time you need a specific sound.
Understanding Plugin Formats: AU vs VST vs AAX
Pro Tools uses its own plugin format called AAX, but it also supports other formats depending on your system. Understanding these formats helps you avoid frustration when copying and pasting plugins.
AAX Plugins
AAX is the native format for Pro Tools. These plugins are optimized for the software and offer the best performance and stability. When you copy and paste AAX plugins, they work seamlessly because they are designed specifically for Pro Tools. Most plugins you buy from companies like Waves, Avid, and iZotope come in AAX format.
VST and AU Plugins
VST (Virtual Studio Technology) is the standard format for Windows, while AU (Audio Units) is the standard for Mac. Pro Tools can support these formats, but with limitations. On Mac, Pro Tools supports AU plugins. On Windows, it supports VST plugins. When you copy a session between systems, VST or AU plugins may not transfer correctly if the destination system does not support that format.
This is an important consideration when sharing sessions with collaborators. Always make sure everyone is using compatible plugin formats to avoid missing plugins or broken signal chains. AAX plugins are the safest choice for Pro Tools users because they work natively on both Mac and Windows within the software.
Common Mistakes to Avoid When Copying Plugins
Even experienced users make mistakes when copying plugins in Pro Tools. Being aware of these pitfalls helps you avoid headaches and keeps your sessions running smoothly.
Forgetting to Check Plugin Licensing
Some plugins require individual licenses for each instance. If you copy a plugin to a new track, Pro Tools may ask you to authorize another instance. This is common with higher-end plugins that limit the number of simultaneous uses. Make sure you have enough licenses before pasting plugins across many tracks.
Ignoring Latency Compensation
When you paste plugins, especially complex ones like linear phase EQs or convolution reverbs, they can introduce latency. Pro Tools has latency compensation built in, but you should always check that your tracks are still aligned properly after copying plugins. If you notice phase issues or timing problems, check the plugin latency settings.
Overwriting Existing Plugin Chains
One of the most common mistakes is pasting plugins onto a track that already has a signal chain. This overwrites the existing plugins without warning. Always double-check the destination track before pasting. You can use the undo function (Ctrl+Z or Cmd+Z) if you accidentally paste over existing plugins.
Not Bouncing Before Sharing Sessions
If you are sending a session to someone else, make sure all plugins are properly licensed and supported on their system. Copying plugins does not transfer the plugin files themselves. The recipient needs to have the same plugins installed to open the session correctly.
Pro Tips for Efficient Plugin Workflow in Pro Tools
Once you master the basics of copying and pasting plugins, you can take your workflow to the next level with these pro tips.
Use Grouping to Apply Plugins to Multiple Tracks
Pro Tools allows you to group tracks together. When you apply a plugin to one grouped track, it applies to all of them. This is a powerful way to process multiple tracks simultaneously without copying and pasting. Grouping works great for drum buses, background vocal harmonies, and parallel compression setups.
Save Entire Session Templates
If you find yourself building the same plugin chains over and over, consider saving a session template. A template is a Pro Tools session file pre-loaded with your favorite plugins, routing, and settings. You can start every new project from this template and already have your core processing chain in place.
Use the Clip Matrix for Quick Plugin Assignment
The Clip Matrix in Pro Tools lets you assign plugins to specific clips within a track. This is useful when you want different processing on different sections of the same recording. For example, you might want heavier compression on a vocal verse but a lighter touch on the chorus.
Explore Third-Party Plugin Managers
There are third-party tools that help you manage, organize, and transfer plugins between sessions and systems. These plugin managers can save you significant time, especially if you work with a large collection of plugins across multiple projects.
Conclusion
Copying and pasting plugins in Pro Tools is a fundamental skill that every audio engineer and producer should master. It saves time, reduces errors, and keeps your sessions consistent. Whether you use keyboard shortcuts, drag and drop, or preset saving, each method has its place in a well-organized workflow.
Start by practicing the keyboard shortcut method on your next session. Once you feel comfortable, explore presets and templates to build an even faster workflow. The more you use these techniques, the more natural they become. Before long, copying plugins will be second nature, and you will wonder how you ever mixed without them.
Remember to always check licensing, latency, and track routing when moving plugins between tracks. These small habits keep your sessions clean and your mixes sounding professional. With the tips in this guide, you are well on your way to a faster, more efficient mixing experience in Pro Tools.
Frequently Asked Questions
Can I copy plugins from one Pro Tools session to another?
Yes, you can. The best way is to save your plugin chains as presets and load them in the new session. You can also copy entire tracks with their plugins using keyboard shortcuts. Just make sure the plugins are installed and licensed on the computer where you are opening the new session.
Why do my copied plugins sound different on another track?
This usually happens because of differences in track input, output routing, or gain staging. When you paste plugins, the settings stay the same, but the audio feeding into them changes. Adjust the track levels and routing to match the original signal path for consistent results.
Does copying plugins in Pro Tools also copy automation?
Yes, when you copy an entire track using keyboard shortcuts, both the plugins and their automation are copied. If you only copy plugins through the plugin window, automation may not transfer. Always verify automation after pasting to make sure your dynamic settings are intact.
Can I copy plugins between Pro Tools and other DAWs?
Not directly. Pro Tools uses the AAX format, which is specific to Pro Tools. Other DAWs use VST or AU formats. To move plugins between systems, you would need to recreate the chain using equivalent plugins in the other DAW or use preset files if the plugin developer supports cross-DAW preset exchange.
What is the difference between copying a track and copying plugins?
Copying a track duplicates everything including the audio clips, automation, routing, and plugins. Copying only plugins transfers just the processing chain and its settings. Use track copy when you want an exact duplicate and use plugin copy when you only need the processing on a new or existing track.
How many plugins can I copy and paste at once?
There is no hard limit in Pro Tools. You can copy and paste entire plugin chains with dozens of plugins at once. However, keep in mind that too many plugins on a single track can cause latency issues and strain your CPU. It is best to use only the plugins you truly need for each track.