Fridge Compressor Wiring Diagram Guide for Beginners
This guide breaks down the fridge compressor wiring diagram in simple terms every beginner can understand. You will learn what each wire does, how to connect the compressor safely, and common mistakes to avoid. By the end, you will feel confident tackling your own refrigerator wiring project at home.
If you have ever opened up the back of your fridge and felt completely lost by the tangle of wires, you are not alone. A fridge compressor wiring diagram can look like a confusing mess at first glance. But once you understand the basics, it all starts to make sense. This guide is here to walk you through every step in plain, simple language. Whether you are a complete beginner or someone who has tried before and gotten stuck, you will find exactly what you need here.
The compressor is the heart of your refrigerator. It pumps refrigerant through the system and keeps your food cold. Without proper refrigerator compressor wiring, the compressor cannot do its job. A fridge compressor wiring diagram acts as a map that shows you how every wire connects. In this article, we will cover everything from the basics to practical tips. You will learn about wire colors, terminal pins, capacitors, and much more. Let us get started!
Key Takeaways
- A fridge compressor wiring diagram shows you exactly how to connect the wires safely and correctly.
- Understanding the compressor terminal pins (S, R, C) is the foundation of any wiring setup.
- Always disconnect power before working on any fridge compressor wiring.
- Color codes for wires help you identify the right connections fast.
- Common mistakes like swapping start and run wires can damage your compressor.
- A wiring diagram saves time, money, and prevents costly repair calls.
- Testing connections with a multimeter ensures everything is wired properly before powering on.
📑 Table of Contents
- What Is a Fridge Compressor Wiring Diagram?
- Understanding the Compressor Terminal Pins
- Fridge Compressor Wiring Color Codes
- Step-by-Step Fridge Compressor Wiring Guide
- Common Mistakes to Avoid in Compressor Wiring
- Tools You Will Need for Fridge Compressor Wiring
- When to Call a Professional
- Expert Insights on Fridge Compressor Wiring
- How to Read a Fridge Compressor Wiring Diagram
- Key Takeaways
- Conclusion
What Is a Fridge Compressor Wiring Diagram?
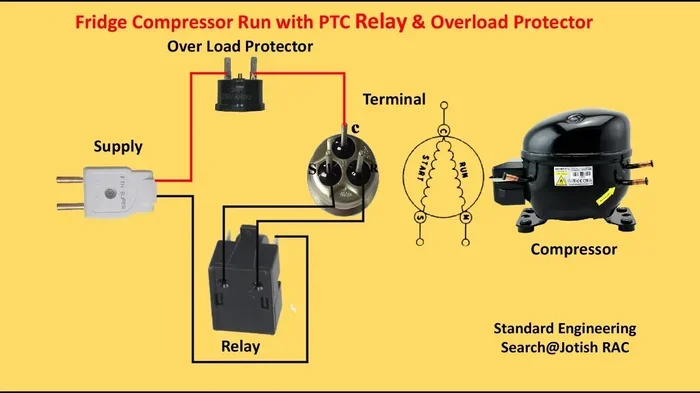
A fridge compressor wiring diagram is a visual drawing that shows how the electrical wires connect to your refrigerator compressor. Think of it like a roadmap. Instead of guessing which wire goes where, the diagram gives you a clear picture. It shows the compressor, the start relay, the run capacitor, and all the connections in between.
These diagrams come in different styles. Some are simple line drawings. Others are more detailed and include the full refrigerator wiring schematic. No matter the style, the purpose is the same. It helps you understand the compressor wiring setup without any confusion.
Why Do You Need One?
Without a refrigerator wiring schematic, you are basically working blind. You might guess the right connections, but guessing can lead to mistakes. A wrong connection can damage the compressor or even create a safety hazard. A proper diagram removes all the guesswork. It gives you confidence and clarity.
Here are a few reasons why a fridge compressor wiring diagram is essential:
- It shows the correct wire-to-terminal connections.
- It helps you identify each wire by its color and function.
- It prevents costly mistakes that can burn out the compressor.
- It makes troubleshooting electrical problems much easier.
- It saves you time and money on professional repairs.
Even if you are not planning to do the work yourself, having a compressor wiring diagram picture helps you understand what your refrigerator technician is working on. It builds your knowledge and helps you ask better questions.
Understanding the Compressor Terminal Pins
Every refrigerator compressor has three main terminal pins. These are labeled S, R, and C. Each one has a specific job. Understanding what they do is the first step in reading any fridge compressor wiring diagram.
S = Start
The S pin stands for Start. This pin connects to the start winding of the compressor. The start winding helps the compressor kick on and begin running. It works together with the start capacitor to give the compressor that initial boost of energy it needs to start up.
R = Run
The R pin stands for Run. This pin connects to the run winding. Once the compressor is running, the run winding keeps it going. It works with the run capacitor to maintain smooth operation. The run winding stays active the entire time the compressor is running.
C = Common
The C pin stands for Common. This is the shared connection point for both the start and run windings. In most fridge compressor wiring steps, the common pin is where the power supply connects first. From there, the current flows to the start and run windings through the relay and capacitors.
When you look at a compressor wiring pins layout, remember this simple rule. S is for starting, R is for running, and C is the common ground. Once you have these three pins straight, you are already halfway to understanding the whole diagram.
Fridge Compressor Wiring Color Codes
Wire colors are not just for decoration. They tell you exactly what each wire does. A fridge compressor wiring color code makes it easy to match wires to the right terminals. However, keep in mind that colors can vary between manufacturers. Always double-check your specific diagram before making any connections.
Here are the most common wire colors you will see in refrigerator compressor wiring:
- Black wire: Usually the run winding connection. This wire carries current during normal operation.
- Red wire: Often connects to the start winding or the start relay.
- Yellow wire: Sometimes used for the start capacitor connection.
- White wire: Commonly the common wire or ground connection.
- Green or bare wire: Always the ground wire for safety.
These colors are general guidelines. Your specific fridge may use different colors. That is exactly why the fridge compressor wiring diagram for your model is so important. Never rely solely on wire color. Always cross-reference with the diagram that matches your refrigerator.
Quick Tip: Label Your Wires
Before you disconnect any wires, take a photo or make a quick sketch of the existing setup. Use small pieces of tape to label each wire. This simple step saves a lot of confusion later. When you are done, you can always refer back to your labels if something does not look right.
Step-by-Step Fridge Compressor Wiring Guide
Now that you understand the pins and wire colors, let us walk through the actual fridge compressor wiring steps. Follow these carefully and always prioritize safety first.
Step 1: Disconnect Power
Before you touch a single wire, unplug the refrigerator from the wall outlet. This is non-negotiable. Working on a live compressor is extremely dangerous. Even if the fridge looks off, there can still be residual charge in the capacitors. Give it a few minutes after unplugging to let everything discharge.
Step 2: Remove the Access Panel
Most refrigerators have a rear access panel held on by screws. Use a screwdriver to remove it. Once the panel is off, you will see the compressor and the wiring connections. Take a moment to look everything over before you start disconnecting anything.
Step 3: Identify the Wires
Look at the wires connected to the compressor. Use your refrigerator wiring basics knowledge to identify each one. Check the wire colors and any labels on the wire itself. Some wires have small printed codes like “S,” “R,” or “C.”
Step 4: Refer to the Wiring Diagram
Find the fridge compressor wiring diagram that matches your refrigerator model. You can usually find this in the user manual or on the manufacturer’s website. Compare the diagram to the actual wires on your compressor. Make sure each wire matches the correct terminal.
Step 5: Connect the Wires
Once you have confirmed the correct connections, attach each wire to its designated terminal. Use a screwdriver to tighten the terminal screws firmly. A loose connection can cause sparking, overheating, or compressor failure. Make sure each wire is snug but do not over-tighten and strip the wire.
Step 6: Check the Capacitors
Do not forget the capacitors. The start capacitor and run capacitor are critical parts of the compressor start and run process. Make sure they are connected properly according to the diagram. A wrong capacitor connection can prevent the compressor from starting at all.
Step 7: Test Before Powering On
Before you plug the fridge back in, do a quick visual inspection. Make sure no wires are loose or touching each other. Use a multimeter to test continuity if you feel comfortable. This extra step can save you from a nasty surprise when you turn the power back on.
Step 8: Power On and Monitor
Plug the refrigerator back in and listen carefully. A healthy compressor will hum steadily and the fridge will start cooling. If you hear clicking, buzzing, or nothing at all, turn it off immediately and recheck your connections. A fridge electrical troubleshooting session may be needed if something does not sound right.
Common Mistakes to Avoid in Compressor Wiring
Even with a good diagram, mistakes can happen. Here are the most common errors people make when working on refrigerator compressor wiring. Avoid these and you will save yourself a lot of headaches.
Mistake 1: Working on a Live Compressor
This is the number one mistake. Never work on compressor wiring while the fridge is plugged in. Electrical shock is a real danger, and a live compressor can cause serious injury. Always, always disconnect the power first.
Mistake 2: Ignoring the Wire Color Code
Just because a wire is black does not mean it is always the run winding. Manufacturers sometimes use different color schemes. Always follow the fridge compressor wiring diagram specific to your model. Do not assume based on color alone.
Mistake 3: Loose Terminal Connections
A loose wire on a terminal can arc and overheat. This can melt the terminal and damage the compressor. Make sure every connection is tight and secure. Give each wire a gentle tug after connecting it to confirm it is firm.
Mistake 4: Forgetting the Ground Wire
The ground wire is there for your safety. Skipping it or connecting it incorrectly can lead to electrical faults. Always connect the green or bare ground wire to the designated ground terminal on the compressor.
Mistake 5: Mixing Up Start and Run Wires
Swapping the start and run wires is a common error. This can cause the compressor to run poorly or not at all. The compressor wiring setup depends on the correct assignment of S, R, and C. Double-check before you power on.
Mistake 6: Not Checking the Capacitors
Capacitors store electrical energy even when the fridge is unplugged. A faulty capacitor can cause wiring problems even if everything else is correct. Always test your capacitors before starting any wiring work.
Tools You Will Need for Fridge Compressor Wiring
Having the right tools makes any job easier. Here is a simple list of what you will need for fridge compressor wiring:
- Screwdriver set: Flathead and Phillips for removing panels and tightening terminals.
- Multimeter: Essential for testing voltage, continuity, and capacitor charge.
- Wire stripper: For preparing wire ends if you need to make new connections.
- Electrical tape: To insulate connections and prevent short circuits.
- Wire nuts or connectors: For joining wires securely.
- Flashlight or headlamp: The back of a fridge can be dark and hard to see.
- Camera or phone: For taking photos of existing wiring before you disconnect anything.
Having these tools ready before you start will make the whole process smoother. You will not have to stop in the middle of the job to hunt for something you need.
When to Call a Professional
While a fridge compressor wiring diagram can guide you through most basic wiring tasks, some situations call for a professional. If you are not comfortable working with electrical components, it is perfectly okay to call a technician. Refrigerators contain refrigerant gases that require special handling and certification.
You should also call a professional if:
- The compressor is not receiving power even after correct wiring.
- You notice burning smells or scorch marks on the wires.
- The compressor trips the circuit breaker repeatedly.
- You are unsure about any part of the compressor wiring setup.
- Your refrigerator still uses a refrigerant type that requires EPA certification to handle.
A qualified technician has the training and tools to handle complex issues safely. There is no shame in calling for help. What matters most is that your fridge works correctly and safely.
Expert Insights on Fridge Compressor Wiring
According to HVAC professionals, the most important thing a beginner can do is study the fridge compressor wiring diagram before touching any wires. Take your time. Read the diagram three or four times if you need to. Understanding the layout before you start prevents costly errors.
Seasoned repair technicians also recommend keeping a basic wiring diagram for your specific fridge model in a safe place. If you ever need to do repairs in the future, having the diagram on hand makes the job much faster. Many manufacturers offer free diagrams on their websites if you provide the model number.
One tip from experienced repair techs: always clean the compressor terminals before reconnecting wires. Over time, corrosion can build up on the terminals. A quick wipe with a wire brush or sandpaper ensures a solid electrical connection. This small step can make a big difference in how well your compressor runs.
How to Read a Fridge Compressor Wiring Diagram
Reading a diagram for the first time can feel intimidating. But it is really not that hard once you know what to look for. Most diagrams use simple symbols. A rectangle usually represents the compressor. Lines represent wires. Circles or small boxes represent components like relays and capacitors.
Start by finding the power source on the diagram. Then follow the lines to see how the current flows. Look for the S, R, and C labels on the compressor symbol. Trace each wire from the terminal to its destination. Once you see the path the current takes, the whole diagram starts to click.
If you are struggling, try printing out the diagram and using colored markers to trace each path. This visual method helps many beginners understand refrigerator wiring basics much faster. Practice with a diagram of a simple circuit first, and then move on to your actual fridge.
Key Takeaways
- A fridge compressor wiring diagram shows you exactly how to connect the wires safely and correctly.
- Understanding the compressor terminal pins (S, R, C) is the foundation of any wiring setup.
- Always disconnect power before working on any fridge compressor wiring.
- Color codes for wires help you identify the right connections fast.
- Common mistakes like swapping start and run wires can damage your compressor.
- A wiring diagram saves time, money, and prevents costly repair calls.
- Testing connections with a multimeter ensures everything is wired properly before powering on.
Conclusion
A fridge compressor wiring diagram is one of the most useful tools you can have when working on your refrigerator. It takes the mystery out of electrical connections and gives you a clear path to follow. From understanding the S, R, and C terminal pins to matching wire colors and checking capacitors, this guide has covered the essentials you need to know.
Remember to always put safety first. Disconnect the power, take your time, and never guess. If something does not feel right, step back and recheck your work. And if you ever feel unsure, there is no harm in calling a professional. A properly wired compressor keeps your fridge running efficiently and your food fresh.
Use the fridge compressor wiring diagram in this guide as your starting point. With patience and practice, you can handle basic compressor wiring with confidence. Your refrigerator will thank you, and you will have gained a valuable skill that saves you money and hassle in the long run.
Frequently Asked Questions
What are the three pins on a fridge compressor?
The three pins are S (Start), R (Run), and C (Common). The Start pin connects to the start winding, the Run pin connects to the run winding, and the Common pin is the shared connection point. A fridge compressor wiring diagram will show you exactly where each pin connects.
Can I wire my fridge compressor without a diagram?
It is not recommended. Without a proper diagram, you risk making incorrect connections that can damage the compressor or create safety hazards. A refrigerator compressor wiring diagram removes guesswork and helps you connect everything correctly the first time.
What wire colors are used for fridge compressor wiring?
Common colors include black for the run winding, red for the start winding, yellow for the start capacitor, and white for the common wire. However, colors can vary by manufacturer. Always refer to the specific fridge compressor wiring color code for your refrigerator model.
How do I test if my compressor wiring is correct?
Use a multimeter to check continuity across the windings and test for proper voltage at the terminals. You can also listen for a steady hum when the compressor starts. If you hear clicking or buzzing, recheck your fridge electrical troubleshooting and wiring connections.
Is it safe to work on a fridge compressor myself?
It can be safe if you follow proper precautions. Always disconnect power before working, use insulated tools, and refer to a reliable fridge compressor wiring guide. If you are not comfortable with electrical work, it is best to hire a qualified technician.
What should I do if my compressor does not start after wiring?
First, double-check all wire connections against the compressor wiring setup diagram. Make sure the start and run capacitors are connected properly. Test the capacitors and relay with a multimeter. If everything checks out, the issue may be with the compressor itself and a professional evaluation may be needed.