How to Get to Administrative Tools in Windows 11 Fast
Finding administrative tools in Windows 11 is easier than you think, and this guide walks you through every method step by step. Whether you prefer using the search bar, the Power User menu, or the Run command, you will have fast access in minutes. We cover all the essential system tools you need to manage your PC like a pro.
Navigating Windows 11 can feel overwhelming at first, especially when you need to dig into system-level settings. The administrative tools in Windows 11 give you power over your computer that regular users never see. From managing disk drives to reviewing system logs, these tools are built right into your operating system.
But here is the problem. Microsoft buried many of these tools deep inside menus, making them hard to find. If you have ever stared at your screen wondering where to go next, you are not alone. This guide solves that problem once and for all.
Below, you will learn five proven methods to access administrative tools quickly. Each method works differently, so pick the one that feels most natural to you. By the end of this article, you will be able to open any system tool in seconds.
Key Takeaways
- Multiple Access Methods: There are at least five different ways to reach administrative tools in Windows 11, so you can pick what works best for you.
- Windows Search Is the Fastest: Typing a few letters in the search bar gets you to tools like Computer Management and Device Manager in seconds.
- Power User Menu Is a Hidden Gem: The Win+X shortcut opens a menu packed with admin tools right at your fingertips.
- Run Command Saves Time: Typing a simple command like compmgmt.msc opens tools instantly without navigating menus.
- Desktop Shortcuts Boost Productivity: Creating a shortcut on your desktop gives you one-click access to your most-used administrative tools.
- Avoid Common Mistakes: Running tools as a standard user instead of an administrator can limit what you can do.
📑 Table of Contents
- What Are Administrative Tools in Windows 11?
- Method 1: Using the Windows Search Bar
- Method 2: The Power User Menu (Win+X)
- Method 3: Through the Control Panel
- Method 4: Using the Run Command
- Method 5: Creating a Desktop Shortcut
- Bonus Tips for Power Users
- Common Mistakes to Avoid
- Final Thoughts
- Related Articles
What Are Administrative Tools in Windows 11?
Administrative tools are a collection of system utilities that let you manage and monitor your computer at a deeper level. Think of them as the behind-the-scenes controls that keep your PC running smoothly. Regular users interact with basic settings every day, but administrative tools go far beyond that.
These tools include Computer Management, Device Manager, Disk Management, and Event Viewer. Each one serves a specific purpose. For example, Disk Management lets you partition hard drives, while Event Viewer shows you detailed system logs that can help troubleshoot problems.
Most of these tools are grouped under a folder called Windows Administrative Tools. You can find this folder inside the Control Panel or through the Start menu. However, accessing them through folders alone can be slow. That is why the methods below are so valuable.
Method 1: Using the Windows Search Bar
The Windows Search bar is the quickest way to reach almost anything in Windows 11. It sits front and center on your taskbar, ready to use at any time. You can type in a few keywords and instantly pull up the tool you need.
Step-by-Step Guide
- Click on the Search bar at the bottom of your screen.
- Type a keyword like “computer management” or “disk management.”
- Look for the result that matches the tool you want.
- Right-click the result and choose “Run as administrator.”
- The tool will open with full admin privileges.
This method works for nearly every administrative tool in Windows 11. You can also search for terms like “event viewer,” “services,” or “local security policy.” The search system is smart enough to find what you need even if you only type a partial name.
Pro Tip: If you use a specific tool often, pin it to your Start menu or taskbar after opening it. This saves you from searching every time. Simply right-click the tool in the search results and select “Pin to Start” or “Pin to taskbar.”
Method 2: The Power User Menu (Win+X)
The Power User menu is one of Windows 11’s best-kept secrets. Pressing the Windows key + X on your keyboard opens a shortcut menu loaded with administrative tools. It is a favorite among power users and IT professionals for good reason.
What You Will Find in the Win+X Menu
The Power User menu gives you direct access to several important tools without any extra clicking. Here are some of the tools you will see:
- Device Manager — Manage hardware devices and drivers.
- Disk Management — Partition and format storage drives.
- Event Viewer — View detailed system and application logs.
- Computer Management — A central hub for multiple admin tools.
- Task Manager — Monitor running processes and system performance.
- Terminal (Admin) — Open Command Prompt or PowerShell with admin rights.
Not all of these options appear by default. Some may need you to adjust your taskbar settings or link specific tools to the menu. But the core administrative tools are all there, waiting for you to discover them.
Quick Tip: If you do not see a specific tool in the Win+X menu, you can customize it. Right-click the taskbar, select “Taskbar settings,” and then look for the “Taskbar corner overflow” or “Navigation” options. You can also edit the Win+X menu by modifying the Windows shortcut links through PowerShell.
Method 3: Through the Control Panel
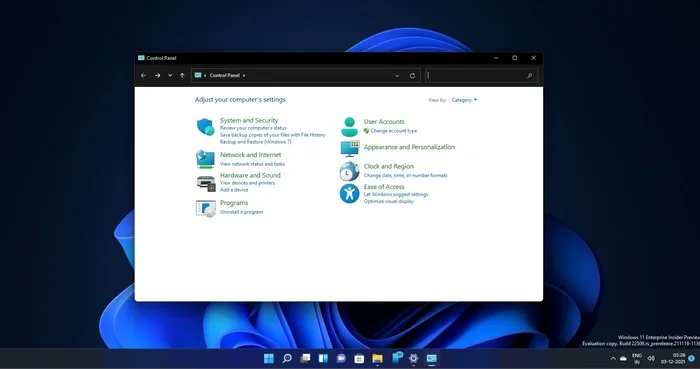
The Control Panel is the traditional way to access system settings in Windows. While Microsoft is pushing users toward the new Settings app, the Control Panel still holds the Administrative Tools folder. It is a reliable option that has been around for decades.
How to Access Administrative Tools via Control Panel
- Press the Windows key and type “Control Panel.”
- Open the Control Panel from the search results.
- Click on “System and Security.”
- Under the “Administrative Tools” section, click the link.
- Double-click any tool to open it with admin rights.
The Control Panel method is great because it shows you all the administrative tools in one place. You will see familiar names like “Computer Management,” “Services,” and “Performance Monitor.” It is a clean, organized view that makes browsing easy.
One thing to keep in mind is that the Control Panel interface looks a bit different from the modern Settings app. It uses a classic category layout, which some users find more intuitive. If you are comfortable with older Windows versions, this method will feel right at home.
Method 4: Using the Run Command
The Run command is a powerful shortcut that skips all the menus and takes you straight to the tool you want. It uses a simple dialog box where you type a command and press Enter. This method is the fastest for users who like keyboard shortcuts.
How to Use the Run Command
Using the Run command is simple and takes just a few seconds. Here is how it works:
- Press Windows key + R on your keyboard.
- A small dialog box will appear.
- Type the command for the tool you want.
- Press Enter or click “OK.”
- If prompted, confirm the admin permission.
Here are some of the most useful commands for administrative tools:
- compmgmt.msc — Opens Computer Management.
- devmgmt.msc — Opens Device Manager.
- diskmgmt.msc — Opens Disk Management.
- eventvwr.msc — Opens Event Viewer.
- services.msc — Opens the Services console.
- secpol.msc — Opens Local Security Policy.
- lusrmgr.msc — Opens Local Users and Groups.
- perfmon.msc — Opens Performance Monitor.
Once you memorize a few of these commands, you will never need to dig through menus again. The Run command is a game-changer for anyone who works with system tools regularly. It is fast, efficient, and works in every version of Windows.
Expert Insight: You can also open the Run dialog by pressing Ctrl+Esc and then typing the command. Some users prefer this method because it gives them more control over the window that opens.
Method 5: Creating a Desktop Shortcut
If you use a specific administrative tool every day, creating a desktop shortcut is the smartest move you can make. Instead of searching or typing commands, you get one-click access right from your desktop. It is a small setup effort that pays off every single day.
How to Create a Desktop Shortcut
- Right-click on an empty area of your desktop.
- Select “New” and then “Shortcut.”
- In the location field, type the command for your tool (like compmgmt.msc).
- Click “Next.”
- Name the shortcut something recognizable.
- Click “Finish.”
- Right-click the new shortcut and choose “Run as administrator.”
Now every time you need that tool, just double-click the icon. You can also right-click the shortcut and pin it to your taskbar for even faster access. This method is especially helpful for tools you use during troubleshooting or regular maintenance.
Quick Tip: You can change the icon of your shortcut to make it stand out. Right-click the shortcut, go to Properties, click “Change Icon,” and pick a symbol that makes sense. A custom icon helps you find the right shortcut at a glance.
Bonus Tips for Power Users
Once you get comfortable accessing administrative tools, you can take your productivity to the next level. These bonus tips will help you work smarter, not harder.
Use Windows Admin Center for Advanced Management
Windows Admin Center is a modern, web-based tool that gives you centralized control over your Windows systems. It is especially useful if you manage multiple computers or servers. You can download it from Microsoft’s official website and access it through your browser.
Set Up Quick Access with Taskbar Pinning
For the tools you use most often, pinning them to your taskbar eliminates the need to search or remember commands. Simply open the tool, right-click its icon in the taskbar, and select “Pin.” You will have instant access every time.
Create a Custom Admin Tools Folder
If you prefer a clean, organized approach, create a dedicated folder on your desktop or in your Start menu. Place shortcuts to all your favorite administrative tools inside it. This gives you a personal dashboard for system management.
Learn the Keyboard Shortcuts
Keyboard shortcuts save enormous amounts of time. Here are the ones you should memorize:
- Win + X — Opens the Power User menu.
- Win + R — Opens the Run dialog.
- Win + S — Opens the Search bar.
- Ctrl + Shift + Esc — Opens Task Manager directly.
Using these shortcuts daily will make you faster and more efficient. Within a week, they will become second nature.
Common Mistakes to Avoid
Even experienced users sometimes make mistakes when working with administrative tools. Here are the most common ones and how to avoid them.
- Forgetting to Run as Administrator: Many tools will not work properly if you do not run them with admin privileges. Always right-click and choose “Run as administrator” when needed.
- Changing Settings Without Understanding Them: Administrative tools give you deep access to your system. Changing settings blindly can cause problems. Always research a setting before modifying it.
- Ignoring System Logs: The Event Viewer contains valuable information about errors and warnings. Ignoring these logs means missing clues that could help you fix problems faster.
- Not Backing Up Before Making Changes: Before you make any significant system changes, create a backup. This protects you if something goes wrong.
- Using the Wrong Tool for the Job: Windows has many similar tools that serve different purposes. Make sure you are using the right one for your specific task.
Avoiding these mistakes will keep your system stable and help you get the most out of every administrative tool. When in doubt, take a moment to understand what a tool does before you use it.
Final Thoughts
Getting to administrative tools in Windows 11 does not have to be a frustrating experience. With the methods in this guide, you now have five reliable ways to access any system tool quickly. Whether you prefer the Windows Search bar, the Power User menu, the Control Panel, the Run command, or desktop shortcuts, there is a method that fits your style.
The key is to practice these methods until they become second nature. Start with the one that feels easiest and build from there. Over time, you will find yourself navigating Windows 11 like an expert, tackling system tasks with confidence and speed.
Remember, administrative tools are there to help you. They give you control over your computer that goes far beyond what a regular user can access. Use them wisely, and your Windows 11 experience will be smoother and more efficient.
Now that you know how to get to administrative tools in Windows 11 fast, try a few of these methods right now. Open your favorite tool using one of the techniques above and see how quick and easy it can be.
Related Articles
If you found this guide helpful, you might also enjoy these related technical articles on our site. We cover a wide range of topics to help you get the most out of your technology.
- How Does a Home Generator Work — Learn the basics of home generator operation and what makes them tick.
- Can You Put Gas in a Generator While It S Running — Find out the safe and unsafe practices for refueling generators.
- How Long Does a Generator Last on a Tank of Gas — Understand generator fuel consumption and runtime estimates.
Frequently Asked Questions
What are the administrative tools in Windows 11?
Administrative tools in Windows 11 include Computer Management, Device Manager, Disk Management, Event Viewer, Services, Local Security Policy, and Performance Monitor. These tools let you manage system settings, hardware, and performance at a deeper level than regular users can access.
Can I access administrative tools without admin rights?
Some tools will open in read-only mode without admin rights, but many features will be disabled. To get full access, you need to run the tools as an administrator by right-clicking and selecting “Run as administrator.”
What is the fastest way to open administrative tools?
The fastest way is using the Windows Search bar. Just type the name of the tool you want, and it appears instantly. The Run command (Win+R) is also very fast once you memorize the shortcuts.
Can I add administrative tools to my taskbar?
Yes, you can. Open the tool, right-click its icon in the taskbar, and select “Pin to taskbar.” This gives you one-click access every time you need it.
Are administrative tools the same in Windows 10 and Windows 11?
Most administrative tools are the same, but Windows 11 has a slightly redesigned Start menu and Settings app. The tools themselves, like Computer Management and Device Manager, work the same way in both versions.
What should I do if an administrative tool will not open?
First, make sure you are running it as an administrator. If it still does not open, try using the Run command with the correct .msc file name. You can also check for Windows updates, as some issues are resolved with system patches.