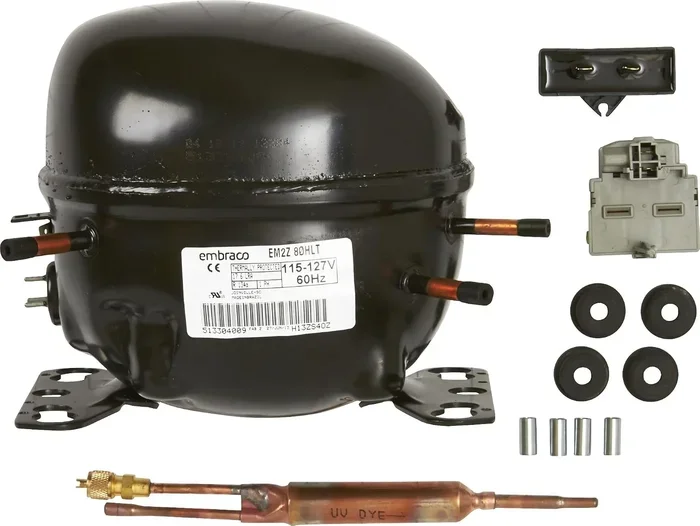
Whirlpool Compressor Replacement Tips and Cost Guide
A Whirlpool compressor replacement can restore cooling performance and extend appliance life. This guide covers failure signs, cost breakdowns, and a step-by-step replacement process. You’ll learn when to call a pro and how to save on parts and labor.
The compressor is the unsung hero of your Whirlpool refrigerator. It pumps refrigerant through the system, keeping your food cold and your ice maker running. When that compressor fails, the entire cooling cycle stops. A Whirlpool compressor replacement can bring your appliance back to life and save you from buying a new fridge.
Many people assume a dead compressor means a costly replacement. But with the right information, you can make a smart decision. This guide walks you through the warning signs, the actual cost, and the replacement process. Whether you tackle the job yourself or hire a technician, you’ll know exactly what to expect.
We also cover preventive maintenance tips that can extend the life of your new compressor. By the end, you’ll have a clear picture of the repair process, the expenses involved, and how to keep your refrigerator running smoothly for years.
Key Takeaways
- Spot failure early: Listen for clicking, grinding, or constant running. Warm air and frost buildup are clear red flags.
- Know the cost: Replacement typically runs $200–$800, depending on the model and whether you hire a pro.
- DIY is possible: With basic tools and safety precautions, many homeowners can swap the compressor themselves.
- Choose the right part: Match the OEM part number or verify specifications like voltage, BTU, and refrigerant type.
- Prevent future issues: Clean condenser coils, keep the fridge level, and check compressor oil regularly.
- Call a pro for refrigerant: Handling refrigerant requires certification, and improper charging can damage the new compressor.
📑 Table of Contents
Warning Signs Your Whirlpool Compressor Is Failing
Compressors rarely die without warning. Catching the early signs can prevent food spoilage and a complete cooling breakdown. Here are the most common symptoms that point to compressor failure.
Unusual Noises from the Fridge
A healthy compressor hums quietly in the background. If you hear loud clicking, grinding, or rattling, the motor inside may be struggling. These sounds often mean the internal components are worn or a relay is failing. Ignoring them can lead to a full compressor breakdown.
Warm Air from the Refrigerator
The most obvious sign is warm air blowing from the vents. If your fridge is running constantly but not cooling, the compressor might not be starting. Sometimes the unit runs but fails to build enough pressure to circulate refrigerant. This is a classic compressor troubleshooting scenario.
Constant Running or Short Cycling
A compressor that never shuts off is working too hard. On the flip side, one that turns on and off every few minutes is short cycling. Both patterns strain the motor and often indicate a failing compressor clutch or low refrigerant levels. Either way, the compressor is under stress.
Ice Buildup and Frost
Excessive frost on the evaporator coils or ice around the freezer walls can signal a compressor that is not pumping properly. When the compressor cannot maintain the right pressure, moisture freezes inside the system. This is different from a simple door seal leak and usually points to compressor diagnosis issues.
Whirlpool Compressor Replacement Cost Breakdown
Understanding the cost of a Whirlpool compressor replacement helps you budget and avoid surprises. The total price depends on several factors, including parts, labor, and refrigerant handling.
Factors That Affect the Price
- Compressor model: OEM parts cost more than aftermarket alternatives but often come with a warranty.
- Labor rates: Technicians in urban areas typically charge more than those in rural locations.
- Refrigerant recharge: If the system lost refrigerant, you will need to pay for the gas and the recharge service.
- Additional parts: A failing compressor can damage the AC compressor relay, start capacitor, or filter-drier, adding to the bill.
DIY vs Professional Cost Comparison
| Cost Item | DIY (Parts Only) | Professional (Parts + Labor) |
|---|---|---|
| Replacement Compressor | $150–$400 | $150–$400 |
| Refrigerant (R134a or R600a) | $20–$50 | $30–$80 |
| Labor | $0 | $200–$500 |
| Total Estimated Cost | $170–$450 | $380–$980 |
For a detailed breakdown of refrigerator compressor costs, check our Cost to Replace Refrigerator Compressor guide. That resource includes model-specific pricing and tips for finding affordable parts.
Average Cost Ranges
Most homeowners spend between $300 and $700 for a complete Whirlpool compressor replacement. The compressor part itself accounts for about half the cost. The rest covers refrigerant, seals, and labor. If you have a newer Whirlpool model, the compressor may still be under warranty, which can reduce your out-of-pocket expense to zero.
Step-by-Step Whirlpool Compressor Replacement
Replacing a refrigerator compressor is a mid-level repair. It requires basic tools, a multimeter, and careful handling of refrigerant lines. Follow these steps to ensure a safe and successful swap.
Safety First: Disconnect Power
Unplug the refrigerator from the wall outlet. Even with the unit off, capacitors can hold a charge. Wait at least 10 minutes before touching any electrical components. Wear insulated gloves and safety glasses to protect against refrigerant leaks or accidental shocks.
Removing the Old Compressor
- Locate the compressor at the back of the fridge, usually near the bottom.
- Remove the access panel or lower kick plate to expose the compressor.
- Disconnect the electrical wires from the compressor terminals. Take a photo first for reference.
- Use a wrench to carefully detach the suction and discharge lines. Place a towel underneath to catch any residual refrigerant.
- Remove the mounting bolts and gently pull the old compressor out.
Installing the New Compressor
- Position the new compressor and secure it with the mounting bolts.
- Reconnect the suction and discharge lines. Use new flare nuts and a torque wrench to tighten them to the manufacturer’s specification.
- Reconnect the electrical wires exactly as they were in the original setup.
- Replace the access panel and kick plate.
Recharging the System
After the physical swap, the system needs refrigerant. This step is critical because a Whirlpool compressor replacement will not cool properly without the correct charge. The process is very similar to how to recharge AC after compressor replacement. You will need a refrigerant gauge set and the appropriate refrigerant type for your model. Add the refrigerant slowly and monitor the pressures until the compressor cycles normally.
Once the system is charged, plug the fridge back in and let it run for 24 hours. Check that the evaporator fan is spinning and that the temperature drops to the recommended range.
Choosing the Right Replacement Compressor
Not all compressors are created equal. Selecting the correct part for your Whirlpool model ensures reliable performance and avoids compatibility issues.
OEM vs Aftermarket Parts
OEM (Original Equipment Manufacturer) compressors are built to the exact specifications of your refrigerator. They carry a manufacturer warranty and often last longer. Aftermarket compressors cost less and can work well, but quality varies between brands. If your fridge is older, an aftermarket part may be the most practical choice.
Matching Specifications
Before ordering, verify the following details from your model’s nameplate:
- Voltage and horsepower rating
- Refrigerant type (R134a, R600a, or R410A)
- Cooling capacity in BTUs
- Physical mounting bolt pattern and line connections
Using the wrong compressor can lead to compressor overheating, electrical failures, or refrigerant leaks. When in doubt, contact Whirlpool customer support with your model number.
Where to Buy Replacement Compressors
You can find replacement compressors at appliance parts retailers, online marketplaces, and Whirlpool’s official parts store. Always compare prices and check return policies. Some suppliers offer refurbished compressors at a lower price, which can be a budget-friendly option if the warranty is solid.
Preventive Maintenance Tips for Compressor Longevity
A new compressor will last longer if you follow a few simple maintenance habits. These practices reduce strain on the motor and keep the refrigerant system clean.
Clean the Condenser Coils
Dust and pet hair build up on the condenser coils, usually located at the back or underneath the fridge. Dirty coils force the compressor to run longer and hotter. Vacuum or brush the coils every six months to improve airflow and efficiency.
Check the Refrigerator Level
An unlevel refrigerator can cause the compressor to vibrate excessively. Use a spirit level and adjust the front leveling legs until the unit is stable. Proper alignment reduces wear on the compressor mounts and internal components.
Avoid Overloading and Proper Ventilation
Overstuffing the fridge blocks cold air circulation, making the compressor work harder. Leave space between items and ensure the door seals are tight. Also, keep the refrigerator away from heat sources like ovens or direct sunlight.
Regularly Inspect the Compressor Oil
Some compressors use a small amount of AC compressor oil or PAG-46 compressor oil to lubricate internal moving parts. If you notice oil leaks around the compressor, have a technician inspect the system. Low oil levels cause friction and premature failure.
When to Call a Professional vs DIY
While a Whirlpool compressor replacement is doable for handy homeowners, some situations call for a licensed technician. Knowing the difference saves time, money, and potential safety hazards.
Complex Electrical Work
If the compressor fails because of a wiring short or a faulty control board, diagnosing the root cause requires electrical expertise. A professional can trace the fault safely and replace any damaged components without risking further damage.
Refrigerant Handling Regulations
Refrigerants are regulated by environmental law. In many regions, only EPA-certified technicians can legally purchase and handle refrigerant. If you are not certified, you must hire a professional for the recharge step. Improper handling can also void your warranty.
Warranty Considerations
Attempting a DIY repair on a refrigerator that is still under warranty may void the coverage. Check your Whirlpool warranty terms before starting the job. If the compressor is still covered, a professional repair is usually the safer and more cost-effective route.
For general compressor repair questions or to find a qualified service provider, visit our Compressor Repair resource page. It helps you locate trusted technicians and understand common repair scenarios.
Conclusion
A Whirlpool compressor replacement is a significant repair, but it does not have to be overwhelming. By recognizing the warning signs early, understanding the cost breakdown, and following a careful step-by-step process, you can bring your refrigerator back to peak performance. Whether you choose to DIY or hire a professional, the key is to use the right parts and handle refrigerant responsibly.
Regular maintenance keeps your new compressor healthy for years. Clean the coils, keep the fridge level, and listen for any unusual sounds. These simple habits prevent premature compressor failure and extend the overall lifespan of your appliance. With the knowledge in this guide, you are well-equipped to tackle a Whirlpool compressor replacement with confidence.
Frequently Asked Questions
How long does a Whirlpool compressor replacement take?
A professional technician can complete the swap in 2 to 4 hours. A DIYer with experience may take a full afternoon, especially if you need to recover and recharge refrigerant. The total time depends on the model and whether additional parts need replacing.
Can I replace the compressor myself if I have no HVAC experience?
It is possible if you are comfortable with basic electrical work and handling refrigerant tools. However, refrigerant charging requires certification in many areas. If you are unsure, hiring a professional is the safest choice to avoid injury or further damage.
What causes a Whirlpool compressor to fail?
Common causes include age, overheating, refrigerant leaks, electrical surges, and lack of maintenance. A clogged condenser coil or a failing start relay can also stress the compressor over time. Identifying the root cause prevents the new compressor from failing prematurely.
Is it cheaper to replace the compressor or buy a new fridge?
If the replacement cost is under 50 percent of a new refrigerator’s price, repairing is usually the better option. A new compressor restores cooling performance without the hassle of disposing of an old unit. Compare the repair estimate with the cost of a new energy-efficient model.
Do I need to replace the refrigerant lines when swapping the compressor?
Not always. If the lines are clean and undamaged, they can be reused. However, if there is corrosion or a leak near the fittings, replacing the lines or the filter-drier is recommended. Flushing the lines with a proper solvent ensures no debris enters the new compressor.
What is the average lifespan of a Whirlpool refrigerator compressor?
A well-maintained compressor typically lasts 10 to 15 years. Factors like usage patterns, ambient temperature, and maintenance habits affect longevity. Regular cleaning and avoiding overloading can push the lifespan closer to the upper end of that range.


