Everything You Need to Know About How to Ohm a Compressor
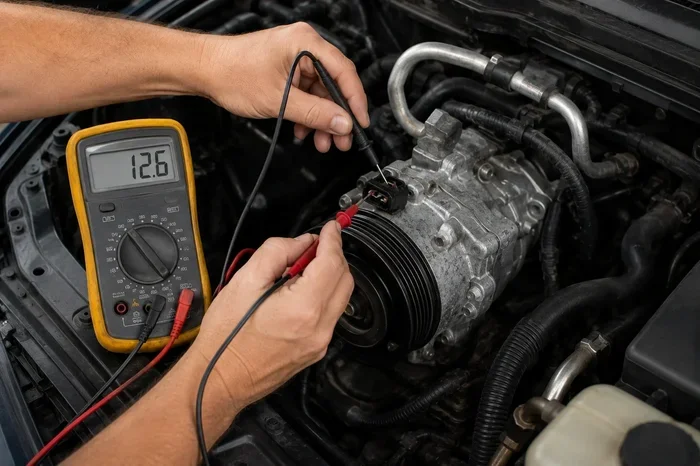
Ohming a compressor means testing the electrical resistance of its motor windings using a multimeter. This simple diagnostic check helps you spot open circuits, short circuits, and ground faults before they cause costly breakdowns. Whether you are a DIY homeowner or a professional technician, knowing how to ohm a compressor saves time, money, and stress.
Compressors are the heart of many systems, from air conditioning units to refrigerators and air tools. When a compressor stops working, the cause is often electrical. One of the fastest ways to figure out what is going wrong is to ohm a compressor. This process measures the resistance inside the motor windings and tells you whether the compressor is healthy or heading for failure.
You do not need to be an electrician to learn this skill. With a basic digital multimeter and a few safety precautions, anyone can test a compressor in under 15 minutes. In this guide, we walk you through every step of how to ohm a compressor, explain what your readings mean, and share tips that even seasoned technicians use on the job.
Whether you are troubleshooting a unit that will not start or just doing routine maintenance, this article gives you everything you need. Let us dive in and make sure your compressor is in good shape.
Key Takeaways
- Ohming a compressor is a basic electrical test that checks winding resistance and helps diagnose motor problems.
- You need a digital multimeter, safety gear, and a basic understanding of compressor terminals.
- Normal ohm readings vary by compressor size and type, but extremely low or infinite resistance signals a problem.
- Always disconnect power before testing and discharge capacitors to stay safe.
- Comparing readings between windings and checking for ground faults gives you a complete picture of compressor health.
📑 Table of Contents
- What Does It Mean to Ohm a Compressor?
- Tools and Safety Gear You Will Need
- How to Ohm a Compressor Step by Step
- Understanding Your Ohm Readings
- Common Mistakes When Testing a Compressor
- When to Call a Professional
- How Compressor Testing Relates to Your Electrical System
- Quick Tips for Accurate Ohm Testing
- Key Takeaways
- Conclusion
What Does It Mean to Ohm a Compressor?
Ohming a compressor simply means measuring the electrical resistance of its motor windings. Every compressor motor has coils of wire wrapped around a core. When you pass a small current through these coils, they create a magnetic field that drives the motor. Over time, these windings can break down, short out, or lose their connection entirely.
When you how to ohm a compressor, you are checking three key things:
- Winding resistance: Are the coils reading within the expected range?
- Continuity: Is there a complete electrical path through each winding?
- Ground faults: Is there any unwanted connection between the windings and the compressor body?
Think of it like checking the pipes in your home. If water flows freely, the pipes are good. If there is a blockage or a leak, you have a problem. Ohming a compressor works the same way, but with electricity instead of water.
The word “ohm” comes from Georg Ohm, the scientist who discovered the relationship between voltage, current, and resistance. When you set your multimeter to the ohm setting (marked with the Greek letter omega, Ω), it sends a tiny current through the circuit and measures how much the compressor resists that flow. High resistance means a problem. Low or zero resistance can also mean a problem. The sweet spot is somewhere in between, and that is what we will look for.
Tools and Safety Gear You Will Need
Before you start testing, gather the right tools. You do not need anything fancy, but having the correct equipment makes the job safer and more accurate.
Essential Tools
- Digital multimeter: A quality auto-ranging multimeter makes reading resistance easy. Look for one that can measure ohms, volts, and amps.
- Screwdriver set: You will need to remove access panels and disconnect wires.
- Safety gloves: Insulated gloves protect you from any residual charge.
- Safety glasses: Always wear eye protection when working with electrical equipment.
- Notepad and pen: Write down your readings as you go so you do not forget them.
Safety First
Electrical work can be dangerous if you skip safety steps. Follow these rules every single time you test a compressor:
- Disconnect all power. Turn off the breaker and unplug the unit if possible. Never work on a live compressor.
- Discharge capacitors. Capacitors store energy even when the unit is off. Use a discharge tool or a resistor to safely drain them.
- Wait a few minutes. Let the compressor cool down before touching any wires. Hot components burn.
- Work in a dry area. Water and electricity do not mix. Make sure your workspace is dry and well-lit.
Taking these precautions seriously is the difference between a safe test and a dangerous one. If you are unsure about any step, consult a licensed electrician.
How to Ohm a Compressor Step by Step
Now let us get into the actual process. This is the part you have been waiting for. Follow these steps carefully and you will have accurate readings in no time.
Step 1: Locate the Compressor Terminals
Every compressor has a terminal box on the side or top. Open the cover and you will see three posts, usually labeled C (common), R (run), and S (start). Some compressors use different labels, but the idea is the same. There are three windings inside, and each one connects to a terminal.
Take a photo or draw a diagram of the wiring before you disconnect anything. This makes reassembly much easier later on.
Step 2: Set Your Multimeter to Ohms
Turn your multimeter dial to the ohm setting (Ω). If your meter is auto-ranging, it will select the correct scale automatically. If not, start with the highest range and work your way down until you get a stable reading.
Make sure your probes are clean and making good contact. Dirty or corroded probe tips can give false readings.
Step 3: Test Between Each Pair of Terminals
You need to take three separate readings:
- C to R: Place one probe on the Common terminal and the other on the Run terminal. Write down the reading.
- C to S: Move one probe to the Start terminal. Keep the other on Common. Write down the reading.
- R to S: Now place one probe on Run and the other on Start. Write down this third reading.
The reading between Run and Start should equal the sum of the other two readings. For example, if C to R reads 2 ohms and C to S reads 3 ohms, then R to S should read 5 ohms. This is a quick sanity check that confirms your meter is working correctly.
Step 4: Test for Ground Faults
This is the most important safety test. Place one probe on any terminal and the other probe on the compressor body (the metal shell). The reading should be infinite (OL on your display) or very close to it. Any reading at all means there is a ground fault, which is a serious problem that needs immediate attention.
If you get a ground fault reading, do not run the compressor. A ground fault can cause electrical shock, fire, or equipment damage.
Step 5: Compare Your Readings to the Specs
Every compressor has a nameplate with technical specifications. Look for the rated winding resistance. Compare your readings to the factory values. Small variations are normal, but large differences mean something is wrong.
For most compressors, you expect readings somewhere between 0.5 and 20 ohms depending on the size. A reading of zero ohms means a short circuit. A reading of OL (over limit) means an open winding. Both are bad news.
Understanding Your Ohm Readings
Getting the numbers is only half the battle. The real skill is knowing what those numbers tell you. Here is a breakdown of common readings and what they mean.
Normal Readings
A healthy compressor will show balanced resistance across all three winding pairs. The readings should be relatively low (usually under 10 ohms for most residential units) but not zero. The R to S reading should equal the sum of C to R and C to S.
If all three readings look good and the ground fault test shows OL, your compressor windings are in good shape. The problem is likely somewhere else, such as a bad capacitor, a faulty relay, or a refrigerant issue.
Open Winding
An open winding means there is a break in the circuit. Your multimeter will read OL or infinity. This happens when a wire inside the motor breaks or a connection corrodes away. An open winding is the most common cause of a compressor that will not start at all.
When you find an open winding, the compressor needs to be replaced. You cannot repair a broken winding inside a sealed compressor.
Short Circuit
A short circuit means two windings are touching when they should not be. Your multimeter will read very low, close to zero ohms. This causes excessive current flow and can burn out the motor quickly.
Short circuits often happen from overheating, vibration, or age. Once a compressor has a short, replacement is usually the only option.
Ground Fault
A ground fault means electricity is leaking from the windings to the compressor shell. This is extremely dangerous and can cause electric shock or fire. A ground fault reading on the ground test is a clear sign the compressor needs to be replaced immediately.
Expert Insight: Technicians often say that a ground fault is the most dangerous reading you can get. Always treat it as a red flag. Even if the compressor still runs, a ground fault will eventually cause a failure that could be much more expensive to fix.
Common Mistakes When Testing a Compressor
Even experienced people make mistakes when testing compressors. Here are the most common errors and how to avoid them.
- Testing without disconnecting power: This is the number one danger. Always verify the unit is completely de-energized before touching anything.
- Forgetting to discharge capacitors: A charged capacitor can deliver a painful or even lethal shock. Always discharge capacitors before handling any wires.
- Not cleaning terminal connections: Corroded terminals give false readings. Clean the terminals with a wire brush or contact cleaner before testing.
- Relying on a single reading: One reading does not tell the whole story. Always take all three winding readings and the ground test.
- Ignoring the nameplate specs: Every compressor is different. Always compare your readings to the manufacturer’s specifications.
Avoiding these mistakes will save you time and prevent misdiagnosis. A wrong reading can send you down the wrong repair path and cost you money.
When to Call a Professional
There is nothing wrong with DIY troubleshooting, but some situations call for a professional. Here are signs that you should call in an expert:
- You get readings that do not make sense even after rechecking.
- The compressor shows a ground fault or short circuit.
- You are uncomfortable working with electrical components.
- The compressor is under warranty and you do not want to void it.
- You need to evaluate the entire HVAC system, not just the compressor.
A professional has the experience and tools to diagnose complex problems quickly. If you are unsure, it is always better to ask for help than to risk your safety or cause further damage to the equipment.
How Compressor Testing Relates to Your Electrical System
Testing a compressor is part of a bigger picture. Your compressor works within an electrical system that includes wiring, breakers, capacitors, and sometimes a generator for backup power. If your compressor keeps tripping breakers or failing to start, the problem might not be the compressor itself. It could be a wiring issue, a weak capacitor, or an electrical supply problem.
For homeowners who rely on backup power, understanding the electrical load of your HVAC system is important. The cost of electrical equipment, including compressors and generators, varies widely based on size and capacity. Knowing how to test your compressor helps you make informed decisions about repairs versus replacements.
Regular maintenance, including ohming a compressor, extends the life of your equipment. Well-maintained compressors last longer, run more efficiently, and cost less to operate. Think of it as a health checkup for your HVAC system.
Quick Tips for Accurate Ohm Testing
- Always test at room temperature. Cold compressors can give different readings than warm ones.
- Take multiple readings and average them if they vary slightly.
- Use the same multimeter for all tests to ensure consistency.
- Document your readings over time. A trend of increasing resistance can predict future failure.
- Test the compressor after it has been off for at least 30 minutes for the most accurate results.
Key Takeaways
- Ohming a compressor is a simple electrical test that checks winding resistance and helps diagnose motor problems.
- You need a digital multimeter, safety gear, and a basic understanding of compressor terminals.
- Normal ohm readings vary by compressor size and type, but extremely low or infinite resistance signals a problem.
- Always disconnect power before testing and discharge capacitors to stay safe.
- Comparing readings between windings and checking for ground faults gives you a complete picture of compressor health.
- Open windings, short circuits, and ground faults all require compressor replacement in most cases.
- Regular electrical testing helps you catch problems early and avoid costly emergency repairs.
Conclusion
Learning how to ohm a compressor is one of the most valuable skills you can have for maintaining your HVAC system or any equipment that uses a compressor. The process is straightforward, the tools are affordable, and the information you gain is incredibly useful. Whether you are a homeowner checking on a unit that will not start or a technician diagnosing a recurring problem, ohming a compressor gives you clear answers fast.
Remember to always put safety first. Disconnect power, discharge capacitors, and take your time. Accurate readings come from careful, methodical testing. If your readings show a problem, do not ignore it. Addressing electrical issues early saves money and prevents bigger headaches down the road.
With the knowledge you gained from this guide, you are now equipped to test any compressor with confidence. Grab your multimeter, find that terminal box, and put your new skills to work. Your compressor will thank you for it.
Frequently Asked Questions
What does it mean to ohm a compressor?
Ohming a compressor means using a multimeter to measure the electrical resistance of the motor windings. This test helps you determine if the windings are intact, shorted, or open. It is one of the first diagnostic steps when a compressor fails to start or runs poorly.
What are the normal ohm readings for a compressor?
Normal readings vary by compressor size and model. Most residential compressors read between 0.5 and 20 ohms across the windings. Always check the nameplate for the manufacturer’s specifications. A reading of zero indicates a short, and OL indicates an open winding.
Can you ohm a compressor while it is running?
No. You must always disconnect all power before testing a compressor. Testing a live compressor is extremely dangerous and can damage your multimeter. Allow the unit to cool down and verify power is off before taking any measurements.
What should the resistance be between C, R, and S terminals?
The resistance between Common and Run (C to R) and Common and Start (C to S) should both be low but not zero. The resistance between Run and Start (R to S) should equal the sum of the other two readings. This confirms the windings are balanced and your test is accurate.
What does an OL reading mean when ohming a compressor?
OL stands for “over limit” and means the multimeter detected infinite resistance. This indicates an open winding, which is a break in the electrical circuit inside the motor. An open winding cannot be repaired and requires compressor replacement.
How often should I test my compressor windings?
There is no set schedule, but testing during routine HVAC maintenance is a smart practice. If you notice the compressor struggling to start, running hotter than usual, or tripping breakers, test the windings right away. Regular testing helps you catch problems before they become expensive failures.