Where Is Table Tools in Excel and How to Use Them Now
You can find table tools in Excel under the Table Design tab on the ribbon. This guide shows you exactly where to look and how to use every feature. Whether you are a beginner or a power user, mastering Excel table tools will save you time and make your spreadsheets look professional.
Have you ever opened Excel and felt completely lost? You know you need to format your data as a table, but you cannot find the tools. You click around the ribbon, stare at menus, and nothing makes sense. This is a problem many people face every single day. The truth is that where is table tools in excel is one of the most common questions beginners ask. Once you know the answer, everything changes. This guide will walk you through every step in plain, simple language.
Excel table tools are powerful features that help you organize, format, and analyze data with just a few clicks. They are not hidden or hard to use. You just need to know where to look. In this article, we will cover exactly how to find table tools in excel, what each feature does, and how you can start using them right away. We will also share tips and tricks that even some advanced users do not know about.
Key Takeaways
- Table Tools live on the Table Design tab: You will find all table options right there on the Excel ribbon.
- Creating a table is simple: Just select your data and press Ctrl+T to convert it instantly.
- Table styles make your data pop: You can choose from dozens of built-in formats to improve readability.
- Structured references simplify formulas: Excel automatically uses table names in formulas, making them easier to read.
- The Total Row feature adds quick sums: You can calculate averages, counts, and totals without writing any formulas manually.
- Table tools work in the Excel desktop app: Some features may differ in the web version, so use the desktop app for full functionality.
- Knowing where table tools are saves hours: Once you find them, your workflow becomes much faster and smoother.
📑 Table of Contents
- What Are Excel Table Tools
- Where Is Table Tools in Excel
- How to Create a Table in Excel
- Understanding Table Styles and Formatting
- Using Table Tools for Data Analysis
- Common Mistakes When Using Table Tools
- Quick Tips for Mastering Excel Table Tools
- Where Else Can You Find Help
- Final Thoughts on Excel Table Tools
What Are Excel Table Tools
Excel table tools are a set of features built into Microsoft Excel. They help you turn plain data into organized, easy-to-read tables. When you select your data and convert it into a table, Excel adds special options. These options let you filter, sort, style, and analyze your data quickly. Think of table tools as your personal data assistant inside Excel.
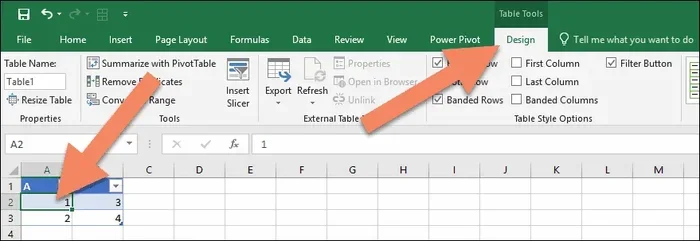
The tools are grouped under a special tab called Table Design. This tab only appears when you click inside a table. Before you create a table, the tab is hidden. That is why many people wonder where table tools are in Excel. The moment you convert your data, everything becomes visible.
Why Use Table Tools in Excel
There are many reasons to use table tools. First, they make your spreadsheets look clean and professional. Second, they save you a ton of time. Third, they reduce errors when you work with large data sets. Here are some key benefits:
- Auto-filtering: Each column gets a dropdown arrow. You can sort and filter data instantly.
- Automatic formatting: Table styles apply colors, borders, and fonts with one click.
- Easy scrolling: Table headers stay visible when you scroll through long lists.
- Dynamic resizing: When you add new rows, the table grows automatically.
- Structured references: Excel uses table names in formulas, making them much easier to understand.
Where Is Table Tools in Excel
This is the big question, and we are here to answer it clearly. Where is table tools in excel depends on which version of Excel you are using. But in most cases, the answer is the same. The table tools appear on the Excel ribbon at the top of your screen. When you click inside a table, a new tab called Table Design appears. This is where all the magic happens.
Step-by-Step: Finding Table Tools on the Ribbon
Follow these steps to locate table tools in your Excel desktop app:
- Open Excel and load your workbook.
- Click on any cell inside your table.
- Look at the ribbon at the top of the screen.
- You will see a new tab labeled Table Design.
- Click on it, and all table tools will appear.
If you do not see the Table Design tab, you may not have an actual table selected. Make sure your data is formatted as a table. You can do this by selecting your data range and pressing Ctrl+T on your keyboard. This shortcut converts any range into a proper Excel table and activates the Table Design tab immediately.
For users working in the Excel desktop app, the experience is the same across Windows and Mac. The Table Design tab sits between the “Layout” and “View” tabs on the ribbon. It is easy to spot once you know where to look.
What You Will See on the Table Design Tab
The Table Design tab is packed with useful options. Here is a quick breakdown of what you will find:
- Table Name: Located on the far left, this shows the name of your current table. You can rename it to something meaningful.
- Table Styles: A gallery of pre-built formats. Click any style to apply it instantly.
- Table Style Options: Checkboxes for header rows, banded rows, total rows, and first/last columns.
- Tools Group: Contains options for resizing tables, converting tables to ranges, and managing duplicates.
- External Table Data: Tools for working with data pulled from external sources.
Each of these sections gives you control over how your table looks and behaves. The more you explore them, the more productive you will become.
How to Create a Table in Excel
Creating a table in Excel is one of the easiest things you can do. It only takes a few seconds. Once you know the process, you will use it every day. Here is how to get started.
Method 1: Using the Insert Tab
You can also create a table from the Insert tab. Here is how:
- Select the range of data you want to turn into a table.
- Go to the Insert tab on the ribbon.
- Click the Table button.
- A dialog box will appear. Make sure “My table has headers” is checked.
- Click OK, and your data is now a table.
After you click OK, the Table Design tab will appear automatically. This is your signal that the table tools are now active and ready to use.
Method 2: Using the Keyboard Shortcut
The fastest way to create a table is with a keyboard shortcut. Simply select your data and press Ctrl+T. That is it. Excel will detect your data range, add headers, and convert it into a table. The Table Design tab will pop up right away. This shortcut is a game-changer for anyone who wants to work faster in Excel.
If you ever want to undo this, you can convert the table back to a regular range. Just go to the Table Design tab, click “Convert to Range,” and confirm your choice. Your data stays intact, but you lose the special table features.
Understanding Table Styles and Formatting
One of the best reasons to use table tools is the built-in formatting. Excel gives you access to dozens of table styles that make your data look great with zero effort. You do not need to be a designer to create beautiful spreadsheets.
Applying a Table Style
To apply a table style, follow these simple steps:
- Click inside your table.
- Go to the Table Design tab.
- Scroll through the Table Styles gallery.
- Hover over any style to see a live preview.
- Click to apply the style you like.
You can also customize any style. Right-click a style in the gallery and choose “Duplicate.” This lets you change colors, fonts, and banding options. You can create your own unique look that matches your brand or personal preference.
Table Style Options You Should Know
Under the Table Design tab, you will find checkboxes for several style options. These are small toggles that make a big difference:
- Header Row: Keeps your column names bold and visible at all times.
- Banded Rows: Alternates row colors to make reading easier.
- Banded Columns: Alternates column colors for a different visual effect.
- Total Row: Adds a summary row at the bottom of your table.
- First Column / Last Column: Makes the first or last column stand out with bold text.
Try different combinations to see what works best for your data. There is no wrong choice here. It is all about making your information clear and easy to understand.
Using Table Tools for Data Analysis
Table tools are not just about looks. They are also powerful data analysis helpers. Once your data is in a table, you can sort, filter, and calculate with ease. Excel does the heavy lifting for you.
Sorting and Filtering Data
Every table comes with filter dropdowns on each column header. Click the arrow, and you can sort data from A to Z, smallest to largest, or by color. You can also filter to show only specific items. This is incredibly useful when you are working with large data sets.
For example, imagine you have a sales table with hundreds of rows. You can filter to show only sales from a specific region or month. The table updates instantly, and you do not need to write a single formula. This is what makes Excel table tools so valuable for everyday work.
Adding a Total Row
The Total Row feature is one of the most underused tools in Excel. To add it, check the “Total Row” box under Table Style Options. A new row will appear at the bottom of your table. By default, it shows the sum of the last column. But you can change this easily.
Click on any cell in the Total Row, and you will see a dropdown. From there, you can choose to display a sum, average, count, minimum, maximum, or many other calculations. This gives you instant summaries without writing any Excel formulas in tables yourself.
Using Structured References in Formulas
When you write formulas inside a table, Excel uses something called structured references. Instead of cell addresses like A2:B10, Excel uses table and column names. For example, a formula might look like =SUM(Table1[Sales]). This makes your formulas much easier to read and understand.
Structured references also update automatically when you add or remove rows. You do not need to adjust your formula ranges manually. This alone is a huge reason to use tables instead of plain ranges.
Common Mistakes When Using Table Tools
Even though table tools are easy to use, people still make mistakes. Here are some common ones to avoid:
- Not converting data to a proper table: Many users format data manually instead of using the Table feature. This means they miss out on all the powerful tools.
- Ignoring the Table Design tab: Once a table is created, many people forget the Table Design tab exists. They do not explore the styles and options available.
- Leaving blank rows in the table: Blank rows can break the table structure. Always keep your data continuous.
- Forgetting to check headers: When creating a table, make sure “My table has headers” is checked. Otherwise, Excel will add generic headers like Column1, Column2.
- Mixing tables and regular ranges: Try not to mix formatted tables with plain ranges in the same sheet. It creates confusion and formulas can break.
Avoiding these mistakes will help you get the most out of your tables. If you run into issues, remember that the Table Design tab is your best friend. Everything you need is right there.
Quick Tips for Mastering Excel Table Tools
Here are some quick tips that will help you work faster and smarter with your tables:
- Use Ctrl+T to create a table in seconds.
- Name your tables something meaningful like “SalesData” or “EmployeeList.”
- Use Alt+J, T, A as a shortcut to toggle the Total Row on and off.
- Right-click any table to access a shortcut menu with quick options.
- Use the “Resize Table” tool when you add new columns to your data.
- Remove duplicates using the Table Design tab under the Tools group.
These tips may seem small, but they add up to big time savings over weeks and months. Practice them until they become second nature.
Where Else Can You Find Help
If you are looking for more Excel tips and troubleshooting guides, you are in the right place. There are many other resources available that can help you get more out of your software tools. Sometimes the best way to learn is by exploring related topics. For instance, if you are curious about how other tools work or need help with general software questions, you might find guides on topics like how to put gas in a generator while it is running or how to fix a window AC compressor that is not working but the fan is running. These may seem unrelated, but they share the same goal: helping you solve everyday problems quickly.
Similarly, if you ever need to understand labor costs for car repairs, such as replacing an AC compressor in your vehicle, helpful resources are available too. The key is knowing where to look, just like knowing where table tools are in Excel. Once you find the right place, everything becomes easier.
The same principle applies across all software and tools. Whether it is Excel, a car repair manual, or a generator troubleshooting guide, the process is the same. Find the right section, learn the features, and practice until you feel confident. Excel table tools are no different. Once you know where to find them, you will wonder how you ever worked without them.
Final Thoughts on Excel Table Tools
Now you know exactly where table tools are in Excel and how to use them. The Table Design tab is your go-to destination for all things related to tables. From creating tables and applying styles to sorting data and adding total rows, these tools make your work faster and your spreadsheets better.
Remember that practice is the key to mastery. Open Excel today, select some data, and press Ctrl+T. Explore the Table Design tab. Try different styles. Add a Total Row. Play with structured references. The more you use these tools, the more natural they will feel.
Do not let the ribbon intimidate you. Every tab and button is there to help you. Where is table tools in excel is a question you will never have to ask again after reading this guide. You now have the knowledge and confidence to use Excel tables like a pro. Start today, and you will wonder how you ever managed without them.
Share this guide with a friend who is still struggling to find table tools. Sometimes the simplest tips make the biggest difference. And remember, the power to organize and analyze your data is just one click away. Happy spreadsheeting!
Frequently Asked Questions
How do I show the Table Design tab in Excel?
Click on any cell inside your Excel table. The Table Design tab will appear automatically on the ribbon at the top of the screen. If you do not see it, make sure your data is formatted as a table by selecting it and pressing Ctrl+T.
Can I use table tools in the free Excel web version?
Some table tools are available in the Excel web version, but the full Table Design tab and all features are only available in the Excel desktop app. For the best experience, use the desktop version on Windows or Mac.
What is the keyboard shortcut to create a table in Excel?
Select your data range and press Ctrl+T on Windows or Command+T on Mac. Excel will detect your data and convert it into a table. Make sure “My table has headers” is checked before clicking OK.
How do I remove table tools formatting but keep my data?
Go to the Table Design tab and click “Convert to Range.” This removes the table formatting and features but keeps all your data intact. Your spreadsheet will return to a regular range format.
Can I add multiple total rows to one table?
No, Excel only allows one Total Row per table. However, you can add multiple subtotal rows using the Subtotal feature under the Data tab. This gives you similar functionality with more flexibility.
Why can’t I find the Table Design tab even though I have a table selected?
This usually happens if you are using the Excel web version or a very old version of Excel. Make sure your app is up to date. Also check that you have clicked directly on a cell inside the table, not just near it.