The Ultimate Guide to Air Compressor Repair Kit Fixes
An air compressor repair kit is a simple, affordable way to fix common problems with your compressor. This guide covers everything you need to know about picking the right kit and using it like a pro. You will learn what each part does, how to spot trouble early, and how to save money on repairs. Keep reading to become your own compressor repair expert.
An air compressor repair kit can save you time and money. If your compressor is making strange noises or losing pressure, a repair kit might be the answer. Many owners face the same common issues every single day. The good news is that most fixes are simple and quick. You do not need to be a mechanic to handle them.
An air compressor repair kit comes with all the parts you need. It includes seals, gaskets, O-rings, and other small components. These kits are designed for specific compressor models. They make it easy to find the right parts without any guesswork. With the right kit, you can get your compressor running again in no time.
In this guide, we will walk you through everything. You will learn what is inside a repair kit. You will also learn how to pick the best one for your machine. We will share step-by-step tips for common repairs. By the end, you will feel confident fixing your own compressor at home.
Key Takeaways
- Air compressor repair kits contain all the parts you need for common fixes
- Knowing your compressor type helps you pick the right kit every time
- Regular maintenance reduces the need for frequent repairs
- Simple tools and basic skills are all you need to get started
- Replacing worn seals and gaskets fixes most air leak problems
- Safety always comes first when working on compressor systems
- Call a pro if the problem goes beyond basic repairs
📑 Table of Contents
- What Is an Air Compressor Repair Kit?
- Common Problems That Need an Air Compressor Repair Kit
- How to Choose the Right Air Compressor Repair Kit
- Step-by-Step Guide to Using Your Air Compressor Repair Kit
- Maintenance Tips to Keep Your Compressor Running Smoothly
- When to Call a Professional for Compressor Repair
- Conclusion
What Is an Air Compressor Repair Kit?
An air compressor repair kit is a collection of parts and tools made for fixing compressors. It is like a first aid kit, but for your machine. Instead of bandages, it has seals, gaskets, O-rings, and fittings. These are the parts that wear out the most over time.
Most kits are made for a specific brand or model. This makes it easy to find the right match. You just need to know your compressor type. Once you have that, picking a kit becomes simple.
What Does an Air Compressor Repair Kit Include?
A typical air compressor repair kit includes several key parts. Here is what you can expect to find inside:
- Seals and gaskets – These stop air from leaking out of joints and connections.
- O-rings – Small rubber rings that create tight seals in fittings.
- Fittings and connectors – Parts that join different pieces of the system together.
- Valve components – These include parts for the unloader valve and pressure switch.
- Belt or pulley parts – For belt drive compressors that need replacement pieces.
- Drain valve parts – Components for the valve that releases moisture from the tank.
Each part plays a role in keeping your compressor running well. When one wears out, it can cause big problems. That is why having a full air compressor repair kit on hand is so helpful.
Types of Kits for Different Compressor Models
Not all compressors are the same. There are different types, and each needs its own kit. Here are the main types you will come across:
- Oil-free compressor kits – Made for compressors that do not use oil. These are common in home workshops.
- Oil-lubricated compressor kits – For compressors that use oil to run smoothly. They often need different seals.
- Belt drive compressor kits – Designed for compressors that use a belt to power the pump.
- Direct drive compressor kits – For compressors where the motor connects directly to the pump.
Always check your compressor model before buying a kit. Using the wrong kit can cause more harm than good.
Common Problems That Need an Air Compressor Repair Kit
Compressors work hard, and parts wear out over time. Knowing the signs of trouble can save you from bigger problems later. Here are the most common issues that an air compressor repair kit can fix.
Air Leaks and Seal Failures
Air leaks are the number one problem with compressors. You might notice your compressor runs more often than it should. Or the pressure gauge drops quickly when you are using pneumatic tools. This usually means air is escaping somewhere.
The most common cause is worn seals or gaskets. Over time, rubber parts dry out and crack. They no longer make a tight seal. This lets air slip past and waste energy.
An air compressor repair kit has the seals and gaskets you need. Replacing them is often a quick job. You can fix the leak and save money on your energy bill. Quick Tip: Use soapy water on joints to find tiny air leaks. Bubbles will show you exactly where the problem is.
Pressure Switch Issues
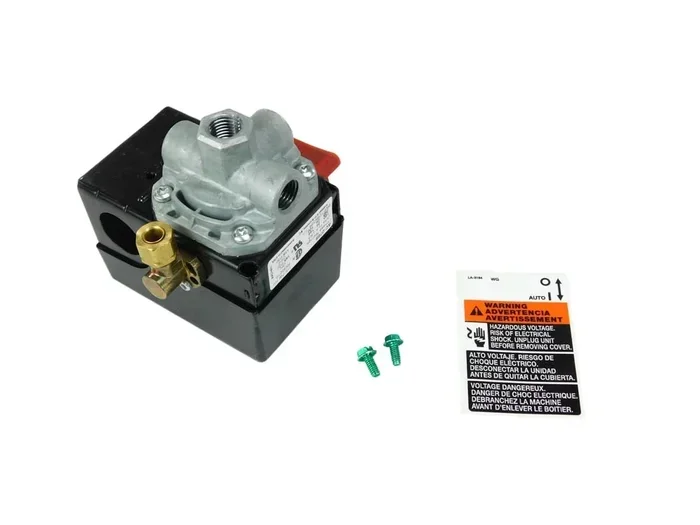
The pressure switch tells your compressor when to turn on and off. When it fails, the compressor either never shuts off or will not start at all. This is a frustrating problem, but it is often easy to fix.
Inside the pressure switch, small parts can wear out. The contacts get dirty or corroded. A repair kit for your model will have the replacement parts. Swapping them out takes just a few minutes in most cases.
Always unplug the compressor before working on the pressure switch. Safety comes first with any electrical part.
Unloader Valve Problems
The unloader valve releases pressure when the compressor shuts off. If it gets stuck, the motor has to work too hard to start. You might hear a loud bang when the compressor kicks on. This is a sign the unloader valve is not working right.
Debris can build up inside the valve over time. A kit with valve components can help you clean or replace the parts. This simple fix can make your compressor run much smoother.
Belt and Motor Troubles
For belt drive compressors, the belt can wear out or slip. You might hear squealing sounds or notice the pump is not building pressure. A worn belt is an easy fix with the right kit.
On the motor side, brushes can wear down over time. Some air compressor repair kit options include motor brushes. Check your manual to see if this is something you can replace yourself. Common Mistake: Never run a compressor with a slipping belt. It can overheat the motor and cause expensive damage.
How to Choose the Right Air Compressor Repair Kit
Picking the right kit is important. A wrong kit will not fit and could cause more damage. Here is how to make sure you get the right one for your machine.
Match the Kit to Your Compressor Model
Every compressor has a model number. You can find it on a label near the motor or on the tank. Write this number down before you shop.
Use the model number to search for the right air compressor repair kit. Most brands offer kits for their specific models. This ensures a perfect fit every time. If you cannot find a kit for your exact model, look for one that is close. Universal kits exist, but model-specific kits are always better.
Check the Quality of Parts in the Kit
Not all kits are made the same. Some use cheap materials that wear out fast. Others use high-grade rubber and metal that last longer. Here is what to look for:
- Material quality – Look for kits with rubber seals and brass fittings.
- Complete contents – A good kit should have everything you need in one box.
- Brand reputation – Buy from trusted brands that specialize in compressor parts.
- Warranty – A kit with a warranty shows the maker stands behind it.
Spending a little more on a quality kit saves money in the long run. Cheap parts fail faster and lead to more repairs down the road.
Quick Tips for Picking the Right Kit
- Always read reviews before buying an air compressor repair kit
- Compare the parts list with what your compressor needs
- Buy from a seller with good return policies
- Consider buying a kit with extra parts for future repairs
- Check if the kit includes clear instructions
Step-by-Step Guide to Using Your Air Compressor Repair Kit
Using an air compressor repair kit is easier than most people think. You do not need special skills or fancy tools. Follow these steps and you will have your compressor fixed in no time.
Preparing for the Repair
Before you start, gather a few basic tools. You will need screwdrivers, wrenches, and pliers. Most of the time, these are the only tools you need beyond the kit itself.
Next, unplug the compressor from the power source. This is the most important safety step. Never work on a compressor that is plugged in. Also, let the tank pressure drop to zero. Open the drain valve to release any remaining air.
Take a photo of the parts before you remove them. This helps you remember how everything goes back together. It is a simple trick that saves a lot of confusion.
Replacing Seals and Gaskets
Start by locating the parts that need replacement. If you have an air leak, check all the joints and connections. Worn gaskets are often the cause. They sit between two metal surfaces and prevent leaks.
Remove the old gasket carefully. Clean the surfaces with a cloth before installing the new one. Dirt or debris can damage the new seal. Place the new gasket in the same position as the old one.
For O-ring replacements, apply a thin layer of compressor oil to the ring. This helps it slide into place and creates a better seal. Do not force the O-ring. It should fit snugly without stretching too much.
Once all new parts are in place, reassemble the compressor slowly. Tighten fittings by hand first, then use a wrench for a final snug turn. Do not over-tighten, as this can crack threads or damage new parts.
Common Mistakes to Avoid
- Skipping the manual – Always refer to your compressor manual for specific guidance
- Using the wrong seal size – Measure twice and install once
- Forgetting to release tank pressure – This is dangerous and can cause injury
- Over-tightening fittings – This can crack threads and create new leaks
- Ignoring small leaks – Small leaks become big problems fast
Testing Your Compressor After Repair
After you have put everything back together, it is time to test. Plug the compressor back in and turn it on. Listen for any unusual sounds. A smooth hum is good. Grinding or rattling means something is not right.
Watch the pressure gauge as the tank fills up. It should reach the cut-off pressure and shut off automatically. If it keeps running, check the pressure switch. If you hear air hissing, look for leaks at the joints you just fixed.
Run the compressor for a few minutes and check for steady pressure. A well-repaired compressor holds pressure without dropping. If it does, your repair was a success. Celebrate that win and put the old parts in your trash. Expert Insight: Keep the old parts as spares. You never know when you might need a backup gasket or O-ring.
Maintenance Tips to Keep Your Compressor Running Smoothly
The best way to avoid repairs is to keep up with maintenance. A little care goes a long way. These simple habits will extend the life of your compressor and reduce the need for an air compressor repair kit.
Daily and Weekly Habits
Make it a habit to drain the tank after every use. Moisture builds up inside the tank and can cause rust. Open the drain valve and let the water out. Do this while the tank is still warm for best results.
Check the air hose and fittings weekly. Look for cracks, wear, or loose connections. A small leak today can become a big problem tomorrow. Tighten fittings and replace worn hoses before they fail.
Keep the area around your compressor clean. Dust and debris can clog the intake vents. This makes the motor work harder and run hotter. A clean compressor runs cooler and lasts longer.
When to Replace Parts Before They Fail
Some parts wear out slowly over time. It is smart to replace them before they cause a breakdown. Here are the parts to watch:
- Gaskets and seals – Replace every 1 to 2 years, even if they look okay
- Belt drive belts – Check for cracks and replace at the first sign of wear
- Air filter – A dirty filter makes the compressor work harder. Replace it regularly
- Unloader valve – Clean it every few months to prevent buildup
Keeping spare parts on hand is a great idea. When you need a quick fix, you will not have to wait for shipping. A well-stocked toolbox with a few extra seals and gaskets can save the day.
When to Call a Professional for Compressor Repair
DIY repairs are great for simple fixes. But some problems need a trained eye. Knowing when to call a professional can save you time and money. It also keeps you safe.
Signs You Need Expert Help
There are clear signs that a repair is beyond a DIY fix. If you notice any of these, it is time to call a pro:
- Strange noises from the motor – Grinding or screeching sounds can mean internal damage
- Oil leaking from the tank – This could signal a serious internal problem
- Electrical issues – If the compressor trips breakers or sparks, stop using it
- Low pressure that will not go away – This might mean the pump itself is worn out
These issues are not something a simple repair kit can fix. A professional has the tools and expertise to handle them safely.
Cost of Professional Repair vs DIY
DIY repairs save you money on labor costs. An air compressor repair kit costs much less than a service call. Most kits range from $20 to $100 depending on the parts included.
Professional repair can cost anywhere from $150 to $500 or more. The price depends on the problem and your location. For simple fixes like seal replacements, DIY is the clear winner. For complex motor or pump issues, a professional is the safer choice.
Think about your skill level and the problem at hand. If you are unsure, it never hurts to get a professional opinion first. Many repair shops offer free estimates.
A strong air compressor repair kit is a must-have for any compressor owner. It gives you the power to fix common problems fast and save money. Keep one in your toolbox and you will be ready for anything.
Conclusion
Fixing your compressor does not have to be hard. An air compressor repair kit gives you everything you need for most common repairs. From air leaks to pressure switch issues, the right kit makes the job simple and fast.
Remember to match the kit to your compressor model. Use quality parts that will last. And always put safety first when working on any machine. With a little practice, you can handle most compressor repairs on your own.
Keep maintenance habits going, and your compressor will serve you well for years. When in doubt, reach out to a professional. But for the day-to-day fixes, your air compressor repair kit has got you covered.
Frequently Asked Questions
What is included in a typical air compressor repair kit?
A standard air compressor repair kit includes seals, gaskets, O-rings, valve components, and fittings. Some kits also come with belt parts or drain valve components. The exact contents depend on the compressor model the kit is designed for.
Can I use any air compressor repair kit for my model?
It is best to use a kit made for your specific compressor model. Different brands and models have different parts and measurements. Using the wrong kit can lead to poor fits and continued problems. Always check your model number before purchasing.
How often should I use my air compressor repair kit?
You should only use the kit when a part is worn or damaged. However, keeping up with regular maintenance can reduce how often you need repairs. Most compressors benefit from a seal replacement every 1 to 2 years as preventive care.
Is it cheaper to repair or replace a compressor?
Repairing with an air compressor repair kit is almost always cheaper than buying a new compressor. Kits cost between $20 and $100, while a new unit can cost several hundred dollars or more. Repair is the smart choice for most common problems.
Do I need special tools for air compressor repair kit fixes?
Most repairs only require basic tools like screwdrivers, wrenches, and pliers. You do not need expensive or specialized equipment. The kit itself provides all the parts, and a few hand tools are all you need to complete the job.
How long does an air compressor repair kit fix usually take?
Most simple repairs take between 15 and 45 minutes. Replacing seals or gaskets is quick and straightforward. More complex repairs like pressure switch or motor work may take longer. Always give yourself enough time to do the job carefully and safely.